


0 of 0
About this mod
This tool generates .tml files for cutscenes which the toolkit requires for editing them.
- Permissions and credits
- Changelogs
This tool generates the TML file for a given Baldur's Gate 3 cutscene, allowing the cinematic to be easily edited in an unlocked version of the toolkit (such as MoonGlasses).
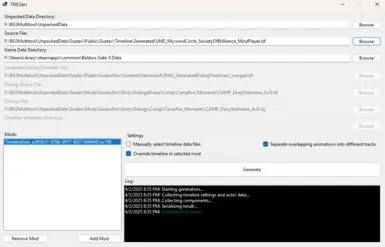
The tool requires the path to your unpacked game directory (as unpacked by the Baldur's Gate 3 Modder's Multitool) along with the source file of the timeline you wish to edit. Additionally, you may select the timeline data to use manually. The definitions below detail the data the tool uses.
Input Examples:
The following details an example set of paths one would use to generate the .tml file for the timeline CAMP_DaisyAcknowledgement_AvD_ROM. Other timelines will have similarly structured input paths.
Automatic Overriding
The tool supports overriding timelines if a mod name and game data path are provided. Note that the mod name must appear as it does in file paths. If the editor is open when you use the tool, you might need to restart it for the override to be recognized.
Manual Overriding
If you want to override a timeline manually, you can do so with the steps below.
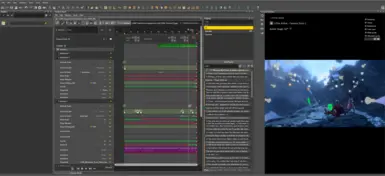
Animations
Many timelines use overlapping animations, but at the time of writing these cause crashes and/or errors in the toolkit. TMLGen separates them into different tracks by default, but this can occasionally cause inconsistencies between the generated file and the original. This often happens due to separated animations relying on one or the other for actor transform information; if you notice actors in incorrect positions or orientations due to animations, try modifying the Offset Type in the animation's properties (for example: changing Previous to Self Start and editing position and rotation).
Similarly, many timelines use overlapping voice components that also crash the toolkit or cause errors. If you attempt to open a timeline sequence and the toolkit crashes, try the following:
The tool requires the path to your unpacked game directory (as unpacked by the Baldur's Gate 3 Modder's Multitool) along with the source file of the timeline you wish to edit. Additionally, you may select the timeline data to use manually. The definitions below detail the data the tool uses.
- Unpacked Data Directory: Top level of unpacked game data as unpacked by the Baldur's Gate 3 Modder's Multitool. Likely called UnpackedData. This article offers more information on how to unpack the game files if you haven't done so already.
- Source File: .lsf source file of the timeline you wish to edit. Likely located in a Public\<mod name>\Timeline\Generated directory.
- Game Data Directory: Contains the .pak files the game uses. The path likely ends with Baldurs Gate 3\Data.
- Generated Dialog Timelines File: .lsf file that contains information linking the timeline and dialog. Likely located in a Public\<mod name>\Content\Generated\[PAK]_GeneratedDialogTimelines directory.
- Dialogs Binary File: .lsf file that contains the compiled dialog data. Likely located in a subdirectory of the Mods\<mod name>\Story\DialogsBinary directory.
- Dialogs File: .lsj file that contains the raw dialog data. Likely located in a subdirectory of the Mods\<mod name>\Story\Dialogs directory.
- Timeline Templates Directory: Not required (will not be present for timelines with no templates). Contains the templates a timeline uses. Likely located in a Public\<mod name>\TimelineTemplates folder and will be named with the timeline's GUID.
Input Examples:
The following details an example set of paths one would use to generate the .tml file for the timeline CAMP_DaisyAcknowledgement_AvD_ROM. Other timelines will have similarly structured input paths.
- Unpacked Data Directory: F:\BG3Multitool\UnpackedData
- Source File: F:\BG3Multitool\UnpackedData\Gustav\Public\GustavDev\Timeline\Generated\CAMP_DaisyAcknowledgement_AvD_ROM.lsf
- Game Data Directory: F:\SteamLibrary\steamapps\common\Baldurs Gate 3\Data
- Generated Dialog Timelines File: F:\BG3Multitool\UnpackedData\Gustav\Public\GustavDev\Content\Generated\[PAK]_GeneratedDialogTimelines\_merged.lsf
- Dialogs Binary File: F:\BG3Multitool\UnpackedData\Gustav\Mods\GustavDev\Story\DialogsBinary\Camp\Campfire_Moments\CAMP_DaisyAcknowledgement_AvD_ROM.lsf
- Dialogs File: F:\BG3Multitool\UnpackedData\Gustav\Mods\GustavDev\Story\Dialogs\Camp\Campfire_Moments\CAMP_DaisyAcknowledgement_AvD_ROM.lsj
- Timeline Templates Directory: F:\BG3Multitool\UnpackedData\Gustav\Public\GustavDev\TimelineTemplates\0e18fce2-99f6-75be-5404-1faee5d19471
Automatic Overriding
The tool supports overriding timelines if a mod name and game data path are provided. Note that the mod name must appear as it does in file paths. If the editor is open when you use the tool, you might need to restart it for the override to be recognized.
Manual Overriding
If you want to override a timeline manually, you can do so with the steps below.
- Locate the timeline files in the Timeline Data\<timeline name> folder created by the tool.
- Place the source and scene files in your mod's Public\<mod name>\Timeline\Generated folder.
- Place the templates folder (whose name will be the timeline's GUID - if no such folder exists, skip this step) in your mod's Public\<mod name>\TimelineTemplates folder.
- Place the .tml and _ref.json files in your mod's Editor\Mods\<mod name>\Timeline\Generated folder.
- Place the Generated Dialog Timelines file (.lsf file whose name ends with _GDT) in your mod's Public\<mod name>\Content\Generated\[PAK]_GeneratedDialogTimelines folder.
- Restart the editor if it is open.
- The tool does not support Combat Timelines.
- The tool currently only supports English for creating timeline reference (_ref.json) files.
- Generation does not give actors descriptive names, relying instead on names like "Additional 2" or "Initiator 1." You can find their actual names by referencing the dialog's speaker list or by hovering over the actor's track.
- The timeline's initial location is inferred. If it is incorrect, you can set it by hand in the editor.
- Slot materials might not work correctly as is. To overcome this, try the following steps:
- Select the actor that owns the slot material.
- Locate the Visual Resource ID property in the sidebar and copy the associated GUID.
- Open the generated .tml file in a text editor.
- Use the Find feature (CTRL + F) to search for "CharacterVisualResourceId" (no quotes).
- Identify which instance of this string is associated with the slot material. It should be under a track that has the name of the actor in question. If there are multiple slot materials, they will be ordered in the same way they appear in the toolkit.
- Replace the CharacterVisualResourceId GUID of the slot material with the one you copied from the editor. Close and reopen the timeline (do not refresh; this will overwrite the change you made).
- If the slot material still does not work, try adding another version of the slot material.
- Open the .tml in a text editor once again.
- Locate the slot material you added as you did above.
- Copy this new slot material's CharacterVisualResourceId to that of the slot material you want to get working.
- Note that some actors support different versions of the same slot material; it might be unclear which to use for this process, so multiple tries with this method might be necessary.
- Actors taken from the world might not work correctly as is. To overcome this, try the following steps:
- Make a backup of the .tml file.
- Note the name of the actor when you hover over it.
- Delete the actor and re-add it.
- Select the actor in the sidebar.
- If the Parent Template ID is not null (all zeros), copy it.
- Undo the changes or restore the backup of the .tml file.
- Open the .tml file in a text editor.
- Use the Find feature (CTRL + F) to search for the name of the actor.
- Replace the ParentTemplateId with the one you copied. If no such attribute is present, add it with the form ParentTemplateId="00000000-0000-0000-0000-000000000000"
Animations
Many timelines use overlapping animations, but at the time of writing these cause crashes and/or errors in the toolkit. TMLGen separates them into different tracks by default, but this can occasionally cause inconsistencies between the generated file and the original. This often happens due to separated animations relying on one or the other for actor transform information; if you notice actors in incorrect positions or orientations due to animations, try modifying the Offset Type in the animation's properties (for example: changing Previous to Self Start and editing position and rotation).
Similarly, many timelines use overlapping voice components that also crash the toolkit or cause errors. If you attempt to open a timeline sequence and the toolkit crashes, try the following:
- Override the associated dialog if it is not overridden already and open it.
- Click on the offending dialog node. An error message might appear, but the sequence should be opened (the preview could be unresponsive) in the timeline editor without crashing.
- Search the voice components for overlapping lines. Components overlapping by any duration can cause the crash.
- Edit the lines so they no longer overlap.
- Save the changes and reopen the timeline.
- Thank you to magnetuning for research into the BG3 dialog system. This would not be possible without his dialog guide and sample mod.
- Thank you to Plouton, Em, and Curious_Cactus for testing.
- This tool uses LSLib, which is created by Norbyte and licensed under the MIT License.