About this mod
A wrapper GUI for the Witcher 3 Mod Tools' wcc_lite.exe
- Requirements
- Permissions and credits
- Changelogs
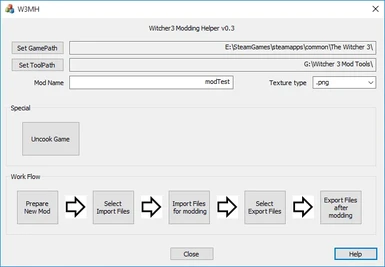
Witcher3 Mod Helper (W3MH) is a gui wrapper for wcc_light.exe.
No need anymore to create those batch files by hand. Made it for my personal use, but thought I could also share to those interested.
Note:
Gah, just when finishing version 0.1, I noticed that there is another tool, apparently doing the same thing: ModKitchen. You might want to check this one out, too (it looks more professional than my work, tbh).
Files
There is only one file: W3MH.exe. It is a VS2013 C++ release compile with statically linked MFC (hence quite big in size). Tested it on Win10.
Current file version: 0.3
File History
0.1: Initial upload
0.2: Improved game cooking ('-skiperrors'), gui overhaul, file selection dlg with more options, import/export textures type selection (png, jpg,...)
0.3: Adapted to modtools update. Added extra selection of export files to cover new textures (added by user). Renamed game uncooked folder to '0'. Added xml files filter. Changed filter setting in file selection dialog.
Usage:
First, you need to have Witcher3 and the Witcher Mod Tools installed. Then, make a folder with a short name and no spaces in the path name (e.g. F:\W3MH\) and place W3MH.exe there. Run and set the paths to the Witcher3 main game folder and to the Mod Tools by clicking the buttons (info will be stored in a local ini file).
To uncook the whole game for later mod use, W3MH will create a directory named '0', create a temp batch file and invoke that. While the batch file is running, W3MH is blocked.
Press 'Prepare New Mod' to create empty processing folders (1_raw' to '5_packed'). Note that existing folders of same names will be deleted!
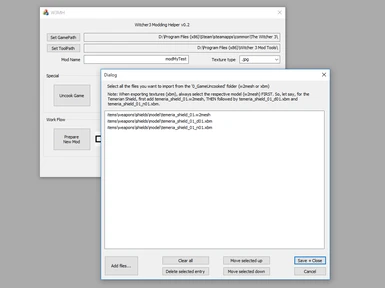
Press 'Select Import Files' to show the file selection dialog and select one or more w2mesh or xbm or xml files. You can delete all or single file names from the list, and also move names up and down in the list. Filenames will be saved in ini file. Note that export of textures without the respective mesh could cause wcc_lite to fail. So, better select mesh first, then texture. Let say, for the Temerian Shield, first add temeria_shield_01.w2mesh, THEN followed by temeria_shield_01_d01.xbm and temeria_shield_01_n01.xbm (or sort them in the file list dialog later).
Invoke another auto-generated batch file by pressing 'Import files for modding'. Data will be stored to the '1_raw' folder.
MANUALLY copy over the content of '1_raw' to '2_modded'. This is not done automatically to avoid file overwrite by accident. Then, do the modding in folder '2_modded' as you see fit.
Press 'Select Export Files' to show the file selection dialog again and select one or more w2mesh or xbm or xml files. Those will be exported to the game later.
By pressing 'Export Files after modding', another batch file will cook and pack your changed files and store the result in '5_packed' finally, from where you can copy it (manually) to the game's mod folder. Run W3 and test...
Have fun modding!


