


0 of 0


About this mod
Every item in the game is scaled to the player's level, with the exception of crossbow bolts. This affects all non-quest items, be they looted, rewarded, bought or crafted (the crafting menu is modified to display scaled levels and stats).
- Requirements
- Permissions and credits
- Changelogs
NOTE: Compatible with Gear Levels Hidden and No Level Requirements if you want to remove item levels from the UI entirely, and Deleveled Gear Prices to keep their trade values fixed as you level up (Script Merger is needed but automatically solves all conflicts). Developed as part of a larger itemization overhaul : LEGO.
There's a good amount of armor to wear and weapons to use ingame, but many are often ignored as their levels trail behind the Witcher. The most popular way to address this issue is to automatically scale the level of all items (or only a subset) to the player's current level, and while this is a perfectly adequate solution in theory, correct implementations that cover all aspects of the problem are hard to come by.
Some mods use custom and often unbalanced methods for scaling, while others use proper vanilla scaling but don't support down-leveling. And while not a huge issue, I've found none that bothered to tweak the crafting menu to properly reflect item scaling. This mod tries to address most, if not all of these issues, using a bidirectional, non-destructive and unbiased item scaler:
This scaler is automatically applied to all* player equipped items after each load or level up, to any items added to the player and to the player's inventory, stash and merchant shops when related menus are opened (and only if the player level has changed since they were last scaled). This minimizes any potential performance impact caused by the scaling, and ensures it never affects actual gameplay by delaying most of it to be executed during menu interactions.
To keep the UI consistent, the crafting menu is tweaked to display the stats and levels of scaled items correctly.
*Quest items are excluded as scaling them could easily break intended difficulty.
INSTALLATION
Remove any previous version of the mod.
Avoid Vortex, TW3 Mod Manager recommended if you need a manager.
Otherwise place the \modItemLevelsNormalized directly inside your <TW3 game install>\Mods folder (or <TW3 game install>\mods wherever your other mods are) & place the \dlcitemlevelsnormalized folder directly inside your <TW3 game install>\dlc folder (or <TW3 game install>\DLC wherever your other dlcs are).
Run a properly installed & configured Script Merger to identify and solve potential conflicts with other mods.
How to install most simple TW3 Mods for newbies/klutzes:
KNOWN ISSUES
This mod was written and tested with vanilla items in mind. Using it along with mods that significantly alter item logic (eg. Ghost Mode) may not work as intended.
FEEDBACK
If you think you've found a bug please report it by leaving a comment.
There's a good amount of armor to wear and weapons to use ingame, but many are often ignored as their levels trail behind the Witcher. The most popular way to address this issue is to automatically scale the level of all items (or only a subset) to the player's current level, and while this is a perfectly adequate solution in theory, correct implementations that cover all aspects of the problem are hard to come by.
Some mods use custom and often unbalanced methods for scaling, while others use proper vanilla scaling but don't support down-leveling. And while not a huge issue, I've found none that bothered to tweak the crafting menu to properly reflect item scaling. This mod tries to address most, if not all of these issues, using a bidirectional, non-destructive and unbiased item scaler:
- Bidirectional: Can down-level just as well as level up items, even for those whose minimum level was previously fixed;
- Non-destructive: Does not permanently change anything. Uninstalling the mod will revert all items to their original levels;
- Unbiased: Leverages the autogen system built into the game for generating items of different levels, to ensure the scaling is uniform and balanced. The original system is extended to support downscaling and to correctly scale weapons with bludgeoning damage as their primary attribute. Furthermore, it maintains each item's uniqueness (the random damage variation and bonuses given to items when they are first created) even as it up/downscales them.
This scaler is automatically applied to all* player equipped items after each load or level up, to any items added to the player and to the player's inventory, stash and merchant shops when related menus are opened (and only if the player level has changed since they were last scaled). This minimizes any potential performance impact caused by the scaling, and ensures it never affects actual gameplay by delaying most of it to be executed during menu interactions.
To keep the UI consistent, the crafting menu is tweaked to display the stats and levels of scaled items correctly.
*Quest items are excluded as scaling them could easily break intended difficulty.
INSTALLATION
Remove any previous version of the mod.
Avoid Vortex, TW3 Mod Manager recommended if you need a manager.
Otherwise place the \modItemLevelsNormalized directly inside your <TW3 game install>\Mods folder (or <TW3 game install>\mods wherever your other mods are) & place the \dlcitemlevelsnormalized folder directly inside your <TW3 game install>\dlc folder (or <TW3 game install>\DLC wherever your other dlcs are).
Run a properly installed & configured Script Merger to identify and solve potential conflicts with other mods.
How to install most simple TW3 Mods for newbies/klutzes:
Spoiler:
First you gotta locate your The Witcher 3 game install location. Usually it's somewhere like "C:\GOG Games\The Witcher 3 Wild Hunt GOTY" for Good Old Games versions of the game or "C:\Program Files (x86)\Steam\steamapps\common\The Witcher 3" for Steam versions of the game.
Mandatory:
Script Merger
Download, run/install it, run what it installed to be sure it's working.
Optional but highly recommended:
TW3 Mod Manager
Download, run/install it, run what it installed to be sure it's working. Installing it all to some place like C:\TW3Modding\ should work.
After that you can install most mods by downloading them manually (VORTEX NOT RECOMMENDED WITH TW3 MODS, IT WILL EVENTUALLY CAUSE PROBLEMS). Extract their contents somewhere (rightclick on the downloaded mod file->extract) and then place their files&folders in the right places in your game install yourself OR let TW3 Mod Manager extract and place them correctly for you (Recommended).
If you're not using TW3 Mod Manager you need to make sure all of your mod's \modxxx folders end up directly inside your <TW3 game install>\Mods folder (or <TW3 game install>\mods, wherever your other mods are). If there's no mods folder in your TW3 game install folder (TW3MM would've created one for you) you can create one by rightclicking on some empty space there -> "New" -> "Folder" and write Mods as its name. That means your \modxxx folders ends up as <TW3 game install>\Mods\modxxx. TW3MM would place it there automatically for you so you wouldn't have to.
If your mod has \dlcxxx folders they similarly need to be directly inside your <TW3 game install>\dlc folder (or <TW3 game install>\DLC wherever your other dlcs are). They should end up as <TW3 game install>\dlc\dlcxxx ( never <TW3 game install>\dlc\dlc\dlcxxx !). TW3MM would do this automatically for you.
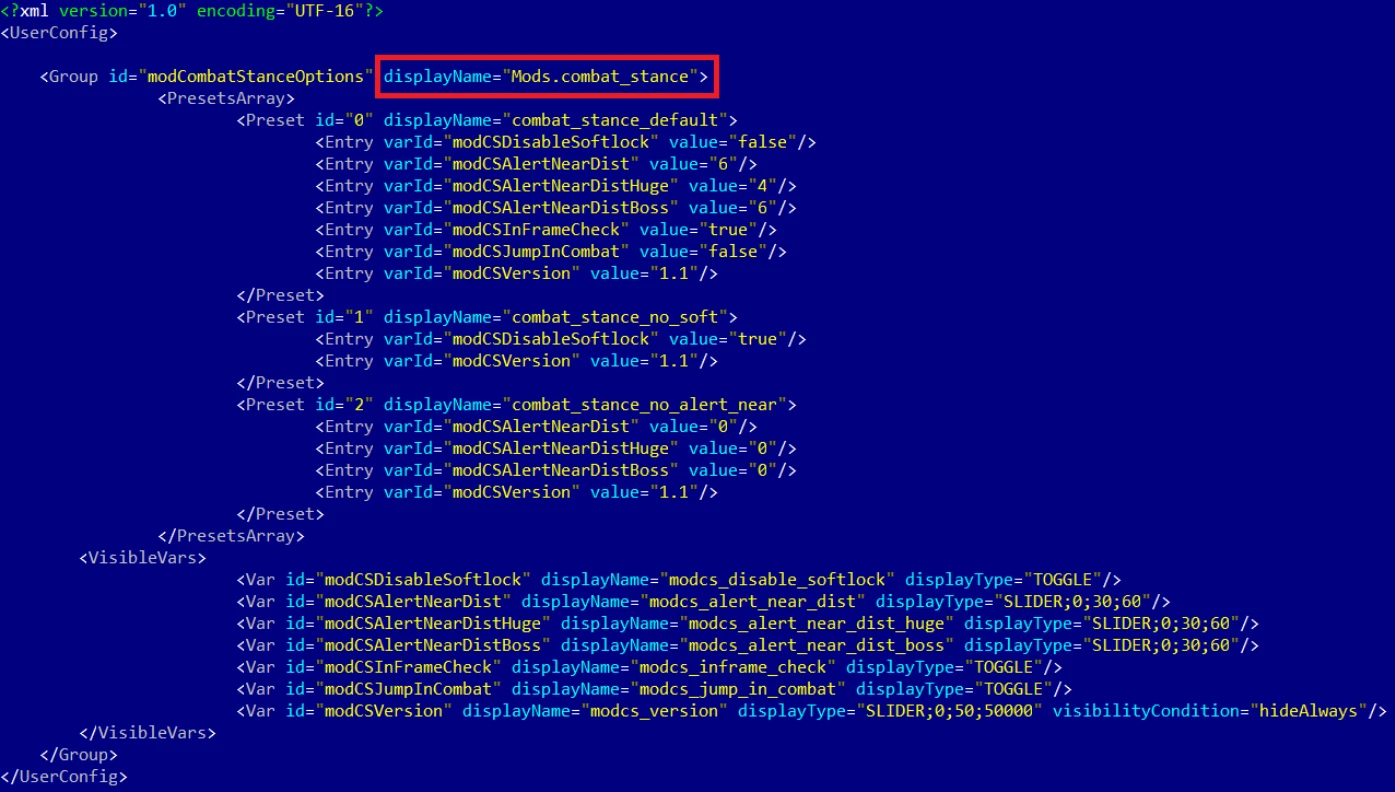
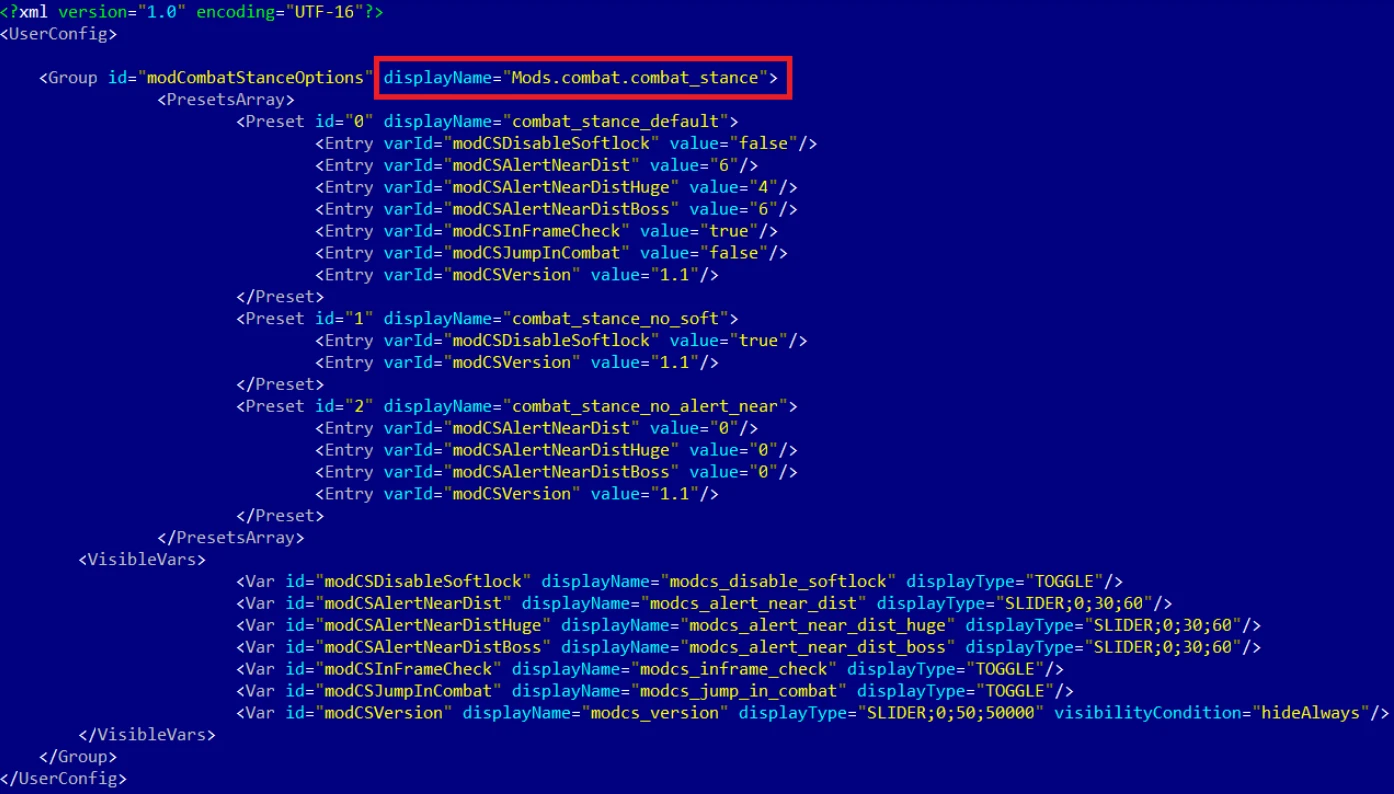
Your mod's mod menu file xxx.xml would have to end up as <TW3 game install>\bin\config\r4game\user_config_matrix\pc\xxx.xml. Again, TW3MM would do this automatically for you. If you happen to have more mod menus tham what can fit on the mod menu list you can easily edit & group mod menus together into subgroups yourself using something like notepad++, example: 1-> 2 (that mod menu was placed in a "combat" subgroup, example from [url=https://www.nexusmods.com/witcher3/mods/3650]Menu Strings).
If your mod has custom keybinds you probably have to add them to your <My Documents>\The Witcher 3\input.settings file using some editor like notepad++. Once more, TW3MM will usually do this automatically for you.
After your mod's files & folders are in the right places you need to run Script Merger and merge any conflicting files that can be merged together (that means both .ws scripts and .xml bundled files).
Sadly, not all mods will automatically merge together, most probably won't (though all LEGO merge automatically with each other, obviously), but some unresolved conflicts can be solved with a little manual help:

The bottom half is the output/result of your merge, the yellow <Merge Conflict> line is the conflicting line that SM can't figure out automatically.
Right click on the merge conflict and you get some simple options:

^There you picked the line from mod 2, but you can also pick the lines from both mods, in any order:

Or you can even write your own code in there. Of course knowing which lines to choose or how to make them work together does require you to somewhat understand what the code does. When in doubt you might try asking the concerned mod's authors & users for help in the comments sections.
However keep in mind that there's no guarantee that any 2 mods can be effectively merged together, nor is there any guarantee that 2 mods are working well together even if they merged automatically and the game seems to be running ok.
That's why to be extra safe you should carefully read each mod's install instructions to make sure there aren't any special instructions or requirements for the mod to work (some mods might require other mods to work such as the unification/community patch or shared imports) or incompatibilities, and then merge & run the game after each new mod install to make sure it's running well.
Show
First you gotta locate your The Witcher 3 game install location. Usually it's somewhere like "C:\GOG Games\The Witcher 3 Wild Hunt GOTY" for Good Old Games versions of the game or "C:\Program Files (x86)\Steam\steamapps\common\The Witcher 3" for Steam versions of the game.
Mandatory:
Script Merger
Download, run/install it, run what it installed to be sure it's working.
Optional but highly recommended:
TW3 Mod Manager
Download, run/install it, run what it installed to be sure it's working. Installing it all to some place like C:\TW3Modding\ should work.
After that you can install most mods by downloading them manually (VORTEX NOT RECOMMENDED WITH TW3 MODS, IT WILL EVENTUALLY CAUSE PROBLEMS). Extract their contents somewhere (rightclick on the downloaded mod file->extract) and then place their files&folders in the right places in your game install yourself OR let TW3 Mod Manager extract and place them correctly for you (Recommended).
If you're not using TW3 Mod Manager you need to make sure all of your mod's \modxxx folders end up directly inside your <TW3 game install>\Mods folder (or <TW3 game install>\mods, wherever your other mods are). If there's no mods folder in your TW3 game install folder (TW3MM would've created one for you) you can create one by rightclicking on some empty space there -> "New" -> "Folder" and write Mods as its name. That means your \modxxx folders ends up as <TW3 game install>\Mods\modxxx. TW3MM would place it there automatically for you so you wouldn't have to.
If your mod has \dlcxxx folders they similarly need to be directly inside your <TW3 game install>\dlc folder (or <TW3 game install>\DLC wherever your other dlcs are). They should end up as <TW3 game install>\dlc\dlcxxx ( never <TW3 game install>\dlc\dlc\dlcxxx !). TW3MM would do this automatically for you.
Your mod's mod menu file xxx.xml would have to end up as <TW3 game install>\bin\config\r4game\user_config_matrix\pc\xxx.xml. Again, TW3MM would do this automatically for you. If you happen to have more mod menus tham what can fit on the mod menu list you can easily edit & group mod menus together into subgroups yourself using something like notepad++, example: 1-> 2 (that mod menu was placed in a "combat" subgroup, example from [url=https://www.nexusmods.com/witcher3/mods/3650]Menu Strings).
If your mod has custom keybinds you probably have to add them to your <My Documents>\The Witcher 3\input.settings file using some editor like notepad++. Once more, TW3MM will usually do this automatically for you.
After your mod's files & folders are in the right places you need to run Script Merger and merge any conflicting files that can be merged together (that means both .ws scripts and .xml bundled files).
Sadly, not all mods will automatically merge together, most probably won't (though all LEGO merge automatically with each other, obviously), but some unresolved conflicts can be solved with a little manual help:
The bottom half is the output/result of your merge, the yellow <Merge Conflict> line is the conflicting line that SM can't figure out automatically.
Right click on the merge conflict and you get some simple options:
^There you picked the line from mod 2, but you can also pick the lines from both mods, in any order:
Or you can even write your own code in there. Of course knowing which lines to choose or how to make them work together does require you to somewhat understand what the code does. When in doubt you might try asking the concerned mod's authors & users for help in the comments sections.
However keep in mind that there's no guarantee that any 2 mods can be effectively merged together, nor is there any guarantee that 2 mods are working well together even if they merged automatically and the game seems to be running ok.
That's why to be extra safe you should carefully read each mod's install instructions to make sure there aren't any special instructions or requirements for the mod to work (some mods might require other mods to work such as the unification/community patch or shared imports) or incompatibilities, and then merge & run the game after each new mod install to make sure it's running well.
KNOWN ISSUES
This mod was written and tested with vanilla items in mind. Using it along with mods that significantly alter item logic (eg. Ghost Mode) may not work as intended.
FEEDBACK
If you think you've found a bug please report it by leaving a comment.