


0 of 0


About this mod
Beautiful cinematic experience, with a good touch of realism - Requires STLM 2.2.1 and ReShade 1.1.0
- Permissions and credits
If you like the mod, PLEASE ENDORSE and SHARE
TESTERS NEEDED
IF YOU ARE INTERESTED IN TESTING THE NEWEST VERSION, PLEASE SEE THE COMMENTS SECTION
Now Includes New Handpicked Weathers and Effects Introduced By Pollens - Retroboy51
See details below
Here is a video I put together in an attempt to recreate portions of the Sword of Destiny Trailer using my ReShade, Cinematic Realism V2.
Vanilla vs STLM + Cinematic Realism V2
STLM 2.2.1 + Cinematic Realism V2 + Pollens
(This is my recommended setup - Weather shown in video is from Pollens!)
Description
Tired of all of the "E3" Presets? All of the "Washed Out" and "Overly Bright" Presets?
Honestly, going back and watching the old E3 trailers, I thought "you know, I bet the modding community could create something better than that".
With the help of STLM 2.2.1, Pollens and this ReShade, I think we have come close.
This ReShade Preset attempts to introduce a beautiful cinematic experience, with a good touch of realism.
And it has made playing the Witcher 3 an amazing experience.
Requirements:
Requires STLM 2.2.1 and is built with ReShade 1.1.0
(I realize both of these mods / programs are older versions, but this is what I based everything off of and it works great)
Please forgive my laziness for not updating for newer versions; I've spent so much time modding that I just want to play the damn game now.
I have created a preset for EACH LOCATION (listed below). Presets have been made for:
White Orchard
Skellige
Toussaint
Kaer Morhen
Velen/Novigrad/Oxenfurt
Vizma Castle
Once you download, you will see there are two separate versions:
1. More Cinematic - Includes Film Grain, Cinematic Letterbox and a little brighter
2. More Realistic - No Film Grain or Letterbox and a little darker
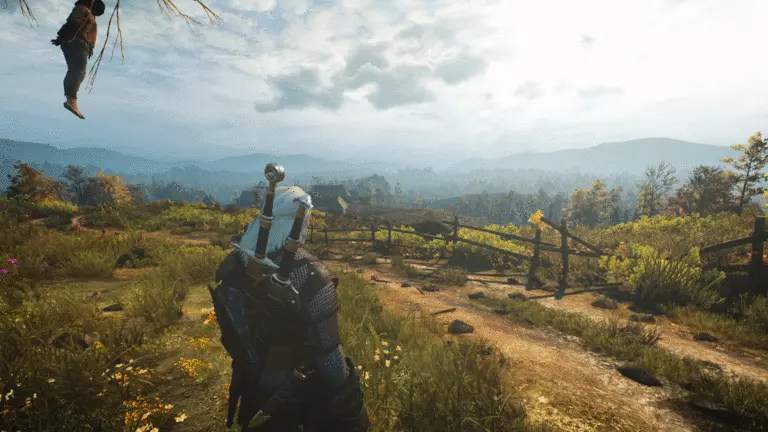
Click Here: See Photo Album for Examples
Both have the option for playing with Depth of Field enabled.
Main Features:
SMAA
HDR Lighting
Bloom
Lens Flare
Color Tuning
Mood Lighting
Depth Of Field (Optional)
Filmgrain (More Cinematic Version)
Cinematic Letterbox (More Cinematic Version)
Average FPS Cost
Without DOF 4-6 FPS
With DOF 10-12 FPS
INSTALLATION PROCESS
You need to install STML 2.2.1 and this mod. This installation is broken up into three parts, two of which are mandatory.
Installation Video:
Here is the Install Video for Cinematic Realism ReShade V2.
This is a long in-depth video which explains how to install, as well as how this ReShade preset works.
Please be sure to watch the video if you have any issues as well as follow the outlined steps below.
Installation Steps:
Part 1 (Mandatory):
1. Download STLM 2.2.1
I realize that 2.2.1 has been removed from the Nexus, but it is still up over at moddb.
Download here: http://www.moddb.com/mods/super-turbo-lighting-mod/downloads/stlm-221
If at some point STLM 2.2.1 is removed from ModDB, we can:
Option 1: Ask essenthy to please upload 2.2.1 (Why he doesnt on the nexus, I dont know) - You can either PM him or ask on twitter (Unlikely to obtain this way)
Option 2: Get the file from other users on the Nexus; this is a great community and shouldn't be hard to do (Most likely to obtain needed file)
2. Once you have STLM 2.2.1 - Copy the Mod (modTurbolighting) to your mods folder in Witcher 3 game directory (If you dont have a "Mods" Folder, create one)
Example of path: E:\Steam\SteamApps\common\The Witcher 3\MODS
Part 2 (OPTIONAL) - NOT REQUIRED BUT HIGHLY RECOMMENDED
Since I created different presets for every location, you have two options:
1. You can either change the files manually after you enter a new location (which isnt hard since the maps are so big and we dont travel out of them too often) - if that's what you want to do then skip this "Part 2" and jump down to "Part 3" below.
2. If you want the presets to change automaticly for you, you can download "Different SFX or ReShade Presets For Each Location by Murzinio" which is a separate mod that will change your ReShade automatically when you enter into a new location. If you decide to use Murzinios Mod, follow the steps on his page and use my files to overwrite his. Also be sure and endorse!
Download from here: http://www.nexusmods.com/witcher3/mods/1827/?
You simply install and run the DifferentSFXPreset.exe in the background and this program will switcher your ReShade mid game automatically when you travel to a new region.
This is how your folder should look once installed:
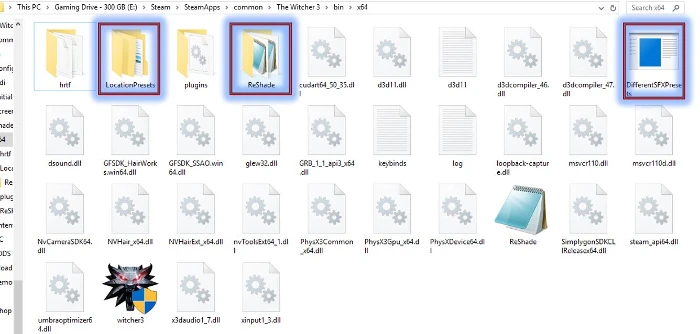
Part 3 (Mandatory)
1. Download My File: Cinematic Realism ReShade V2 (Download Above)
2. Follow the steps included in the file for proper install. Everything should go into your x64 folder.
Example of path: E:\Steam\SteamApps\common\The Witcher 3\bin\x64
3. Basic install goes like this:
Copy Files into Witcher x64 folder ----> Select whether you want DOF or Not ----> Select whether you want the more Cinematic or Realistic Preset ----> Copy Files into LocationPreset Folder (if you are using Differnt SFX or ReShade Mod - See Step 3 below) or Copy the appropriate location files into your ReShade folder.
4. Make sure to ENDORSE AND VOTE FOR Cinematic Realism V2
See the Instructional images included with the main file for better install details.
These files may work with newer versions of ReShade, I dont know and dont really want to try and mess with it honestly; I just wanna play the game.
Part 4 (OPTIONAL) - NOT REQUIRED BUT HIGHLY RECOMMENDED - THIS STEP WILL GIVE YOU BETTER WEATHER AND EFFECTS
I have worked with Retroboy51, the creator of Pollens, to create a custom weather setup which works alongside STLM.
All weathers in the game have been based around Cinematic Realism. So basically, NO MORE BAD LOOKING WEATHERS!!!
If you decide to play with Pollen - Cinematic Realism, you will get new new weathers and effects which have been hand picked to enhance Cinematic Realism.
1. Download Particles - Cinematic Realism: http://www.nexusmods.com/witcher3/mods/2026/? - You will find the file called: Particles - Cinematic Realsim in the optional section.
2. Pollens doesnt have any scripts, so you should just be able to drop it in your mod folder and you are good to go.
3. Make sure to ENDORSE AND VOTE FOR POLLENS
IN GAME SETTINGS:
1. Once in game, set up your Post Processing Effects as listed below:
IN GAME POST PROCESSING:
Bloom: ON
Anti-Aliasing: ON
Light Shafts: ON
Motion Blur: ON
Blur: ON
Ambient Occlusion: ON - HBAO+
Sharpening: OFF
Depth of Field: ON
Chromatic Aberration: ON
Vignette: ON
GammaValue=1.0 (Default Value)
PLEASE NOTE: The above in game settings are just recommendations. You can utilize any in game settings you wish, though if you do so, your game may not look like my screenshots.
In Game Functions:
Turn ReShade Off: Scroll Lock
Turn Depth of Field Off & On: F4 (For those who use DOF version)
Finished!
Known Issues with This ReShade:
Depth of Field: Depth of Field will get a little wacky in cut scenes. Text will blur out, etc. This cannot be fixed within ReShade. So, if you like to Play with Depth of Field, you will either need to learn to live with it, or you can disable DOF during cut scenes (Hit the F4 key). I recommend using Native Depth of Field by KNG: http://www.nexusmods.com/witcher3/mods/1558/?
Frequently asked questions:
Q: What hood are you wearing?
A: I am using AMM and a Texture for the hood from Texture for AMM; here are the links:
http://www.nexusmods.com/witcher3/mods/780/?
http://www.nexusmods.com/witcher3/mods/742/?
Q: How do you get that flaming sword in your screenshots?
A: I am using AMM for the flaming sword
http://www.nexusmods.com/witcher3/mods/780/?
Q: What are your in-game graphics settings? Could you please share them with us?
A: Here are my preferred and recommended Graphic Settings:
GRAPHICS
VSync: Off - I use Nvidia VSync
Maximum Frames Per Second: Unlimited
Resolution: 1920x1080
Display Mode: Full Screen
NVIDIA HairWorks: On - Set to High
Number of Background Characters: Above Ultra (ini settings from DNA)
Shadow Quality: Above Ultra (ini settings from DNA)
Terrain Quality: Ultra
Water Quality: Above Ultra (ini settings from DNA)
Grass Density: Above Ultra (ini settings from DNA)
Texture Quality: Above Ultra (ini settings from DNA)
Foliage Visibility Range: Above Ultra (ini settings from DNA)
Detail Level: Above Ultra (ini settings from DNA)
Hardware Cursor: On
POSTPROCESSING
Motion Blur: On
Blur: On
Anti-aliasing: On
Bloom: On
Sharpening: Off
Ambient Occlusion: On - HBAO+
Depth of Field: On
Chromatic Aberration: On
Vignetting: On
Light Shafts: On
CREDITS
Reshade team - CD Projekt Red - Nexus Community - Murzinio - Essenthy