


0 of 0


About this mod
A tutorial on how to add Standalone armors using Skyedit, Nifskope, and BSA Browser
- Permissions and credits
There are so many fantastic armors that talented modders have made for us here on the nexus. Unfortunately, many are replacers. I decided, that for my own personal use, I would try to create standalone armors.
Since I couldn't find any tutorials on this, I went to finding out how to do it. After a couple hours, I was able to add my first set. So I've decided to write what I learned down and make a tutorial for everyone who would like to make their own standalone armors.
I am not a modder. I've been slowly trying, but have yet to make my own meshes. Instead I've been using mods I've downloaded, and created standalone versions for my own personal use. I will not be uploading any to the nexus, because I do not own them. If you follow this tutorial, you should make sure to do the same. This tutorial will also help modders who make their own meshes, and while you follow the tutorial, you will see when you need to add your own files.
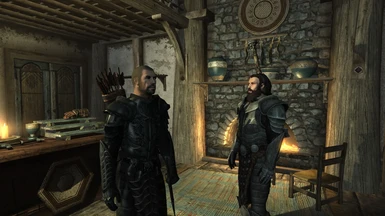
For this tutorial I used Razor Scales Armor and Cannibal Lord Mask by Zerofrost. It's unfortunate he stopped uploading, his armors were some of the best on the site. I DO NOT INCLUDE his textures in this file. I do however reference them, because this is the armor I first made into a standalone set for myself. If he does not wish me to reference his work, I will remove all instances of them from this tutorial.
So now, if you've got 2 sets of nightingale replacers that you just love, you no longer have to decide on just the one. You like that beautiful retex of the wedding dress, but don't want to share it? Now you don't have to.
Want to use those skimpy outfits, but hate that every bar maid has the same outfit as you? make it your own.
This is a pretty lenghty tutorial, and I'm sure I made spelling errors and the like. If you see any errors, or have any input that will make things easier, feel free to comment, and I'll subtract or add it into the guide.
And I'd be happy to see what you've come up with if you want to add your own images.
Edit 2: I believe I have corrected every error. If you've run into purple textures, invisible body parts, etc etc, please re-read the tutorial, it is most likely you read it before I was able to catch my mistakes. I apologize for the confusion it probably caused you.
UPDATED - If you've run into any problems, please re-read the description. It currently is more complete than the download file. If that does not help, please leave a comment and I'll help anyway i can.
How to add standalone armor using skyedit
Tools you will need;
Skyedit
Nifskope
Bsa Browser from FOMM
Alternatively, if you don't have Fallout installed on your pc, you can use;
Skyrim BSA Browser
First we're going to extract our meshes. Open BSA Browser, click on open, and find the Skyrim - Meshes BSA file in your data folder of Skyrim. Expand Meshes once it loads, find armor and extract it to your desktop. You can delete it later when you no longer need it..
~~~~~~~~~~~~~~~~~~~~~~~~~~~~~~~~~~~~~~~~~~~~~~~~~~~~~~~~~~~~~~~~~~~~
Now Start Skyedit and open Skyrim.esm
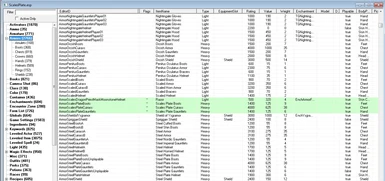
Now, expand Armors in the left pane, and choose chests. For this tutorial I added Razors Scale Armor as a stand alone armor, but you could use this method for adding any armors.
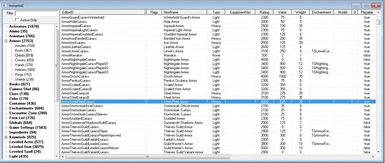
Find "ArmorSteelPlateCuirass"
Right click on it and click "create copy"
You will need to create a new editorID for it, so name it whatever you want. I named it "ArmorRazorScaleCuirass" It will turn green once the name is changed,
Now scroll down to the bottom and find it. It will be highlighted in green.
Right click on it and hit edit. Now you can change the name of the armor to what you want. You can also add enchantments, ratings, weight, armor type. After you have decided what values you want to edit, look for armature models and note the name in the white box. You'll be looking for this next.
Click save if you've edited any values.
Now click on Armatures in the left pane. Scroll down till you find "NordPlateCuirassAA", right click on it, and click create copy. Rename it and find your newly created armature. Right click on it, and hit edit.
Here is where you'll be importing your meshes. Look at what paths the meshes are. Since this is a male mod only, we'll be focusing on "Male Model", and "Male 1st Model".
The Male Model path is Armor\NordPlate\NordCuirassM_1.nif So go to your desktop and find the meshes folder you made with BSA Browser. Find the path that it specifies. Now rename the folder "nordplate" to whatever you want. I renamed it "scalesplate". And rename Cuirassm_1.nif and Cuirassm_0.nif. You'll need both. Also rename 1stpersoncuirass_1.nif and 1stpersoncuirass_0.nif . Now drag the folder you created into Meshes\Armor in your Data folder.
Go back to "Male Model" and type out the path to the meshes you just dragged. Then go to "Male 1st Model" and type out the path to your renamed 1stpersoncuirass_1.nif.
Click save.
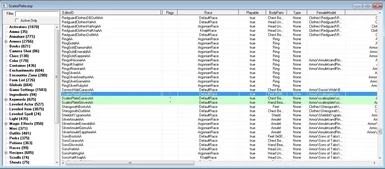
Click again on chests under the Armor tab in the left pane. Find your new item, and right click and then edit.
Go down to Armature Models, click on "NordPlateCuirassAA", and click edit. Now scroll through this new window until you find the armature you created. Once you find it, click OK. Your armature should now be in the box. Click save.
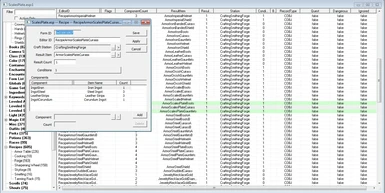
Now go down to Recipes in the left pane, expand it, and click on forge. Scroll down and find "RecipeArmorSteelPlateCuirass". right click, create copy. Rename it. Find your new recipe, and right click, edit. Go to Result Item, and click the " >" button. This will open a new window, scroll down and find the item you made, it should be highlighted in green. Click OK.
Now you can edit what items are required to make this recipe. You can also decide what smithing perk is required to make it by clicking on the box beside "conditions". After you've made your desired changes, click save.
You can also make your armor upgradeable, following the same guidelines as creating a forge recipe. Under "Recipe" in the left pane, click on "Armor Table", and find the corresponding file that matches. Now right click, edit, and click on ">" by "Result Item" and choose your created armor. change what items you want to upgrade it, change the conditions if you want, and click save. Thanks to Tantalus010
Now go up to File, Save As, and name your esp. Make sure to save it to your DATA folder.
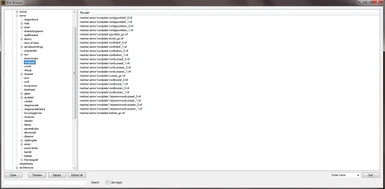
Now, find the textures that you are using. In my case it was Razor Scales textures. You will have to rename these, or they will replace the textures for nordplate armor as well, which would defeat the purpose.
So rename the "steel plate" folder to something else. Now go into the folder and change the name of the files in here. Make sure to keep them the same, for example, nordplateglovesf.dds and nordplateglovesf_n.dds should have the same name, like razorglovesf.dds and razorglovesf_n.dds. Do this for all the files.
Now drag the folder into textures\armor in your DATA folder.
~~~~~~~~~~~~~~~~~~~~~~~~~~~~~~~~~~~~~~~~~~~~~~~~~~~~
Now open Nifskope.
Find the cuirass mesh you made earlier, and open it. In the right pane, you will see a 3d rendering of the armor.
In the Top left, you will see > 0NiNode. Expand it.
Now expand NiTriShape.
Now expand BSLightingShaderProperty.
You will see BSShaderTextureSet, click on it.
Now in the bottom pane, you will see >Textures. Expand it.
You will see the paths to the textures this mesh uses. So double click on the first path, and enter the path to the texture you want to use. Now click on the second path, and enter the path to the texture with _n.dds. Leave the last two paths as they are, since these were not included in Razors textures.
Make sure to open both _0.nif and _1.nif and change the filepath to the correct textures.
If the armor you are using has cubemaps, or an _m.dds, make sure to replace it.
Now go to File, Save As, and overwrite the .nif.
Now you can load up Skyrim, making sure to activate your .esp in Data Files first. So you can now go to the forge, and find your new armor recipe and make it, and see if it worked. You can also use the console to add it to your inventory. Use the help command. So help "whatever you named the cuirass" 4.
So you now have the first piece of your armor in the game, all you need to do now is start the tutorial over, replacing the rest of the items, Gauntlets, Boots, Helm.
After you've gone and added all the pieces using BSA Browser, Skyedit, and Nifskope, you can load up Skyrim and forge your new stand alone armor.
~~~~~~~~~~~~~~~~~~~~~~~~~~~~~~~~~~~~~~~~~~~~~~~~~~~~~
Thanks to Zerofrost for making amazing Texture Replacers, as well as all the modders who take the time to make our games better.
Thanks to the creators of Skyedit, FOMM, and Nifskope.
Since I couldn't find any tutorials on this, I went to finding out how to do it. After a couple hours, I was able to add my first set. So I've decided to write what I learned down and make a tutorial for everyone who would like to make their own standalone armors.
I am not a modder. I've been slowly trying, but have yet to make my own meshes. Instead I've been using mods I've downloaded, and created standalone versions for my own personal use. I will not be uploading any to the nexus, because I do not own them. If you follow this tutorial, you should make sure to do the same. This tutorial will also help modders who make their own meshes, and while you follow the tutorial, you will see when you need to add your own files.
For this tutorial I used Razor Scales Armor and Cannibal Lord Mask by Zerofrost. It's unfortunate he stopped uploading, his armors were some of the best on the site. I DO NOT INCLUDE his textures in this file. I do however reference them, because this is the armor I first made into a standalone set for myself. If he does not wish me to reference his work, I will remove all instances of them from this tutorial.
So now, if you've got 2 sets of nightingale replacers that you just love, you no longer have to decide on just the one. You like that beautiful retex of the wedding dress, but don't want to share it? Now you don't have to.
Want to use those skimpy outfits, but hate that every bar maid has the same outfit as you? make it your own.
This is a pretty lenghty tutorial, and I'm sure I made spelling errors and the like. If you see any errors, or have any input that will make things easier, feel free to comment, and I'll subtract or add it into the guide.
And I'd be happy to see what you've come up with if you want to add your own images.
Edit 2: I believe I have corrected every error. If you've run into purple textures, invisible body parts, etc etc, please re-read the tutorial, it is most likely you read it before I was able to catch my mistakes. I apologize for the confusion it probably caused you.
UPDATED - If you've run into any problems, please re-read the description. It currently is more complete than the download file. If that does not help, please leave a comment and I'll help anyway i can.
How to add standalone armor using skyedit
Tools you will need;
Skyedit
Nifskope
Bsa Browser from FOMM
Alternatively, if you don't have Fallout installed on your pc, you can use;
Skyrim BSA Browser
First we're going to extract our meshes. Open BSA Browser, click on open, and find the Skyrim - Meshes BSA file in your data folder of Skyrim. Expand Meshes once it loads, find armor and extract it to your desktop. You can delete it later when you no longer need it..
~~~~~~~~~~~~~~~~~~~~~~~~~~~~~~~~~~~~~~~~~~~~~~~~~~~~~~~~~~~~~~~~~~~~
Now Start Skyedit and open Skyrim.esm
Now, expand Armors in the left pane, and choose chests. For this tutorial I added Razors Scale Armor as a stand alone armor, but you could use this method for adding any armors.
Find "ArmorSteelPlateCuirass"
Right click on it and click "create copy"
You will need to create a new editorID for it, so name it whatever you want. I named it "ArmorRazorScaleCuirass" It will turn green once the name is changed,
Now scroll down to the bottom and find it. It will be highlighted in green.
Right click on it and hit edit. Now you can change the name of the armor to what you want. You can also add enchantments, ratings, weight, armor type. After you have decided what values you want to edit, look for armature models and note the name in the white box. You'll be looking for this next.
Click save if you've edited any values.
Now click on Armatures in the left pane. Scroll down till you find "NordPlateCuirassAA", right click on it, and click create copy. Rename it and find your newly created armature. Right click on it, and hit edit.
Here is where you'll be importing your meshes. Look at what paths the meshes are. Since this is a male mod only, we'll be focusing on "Male Model", and "Male 1st Model".
The Male Model path is Armor\NordPlate\NordCuirassM_1.nif So go to your desktop and find the meshes folder you made with BSA Browser. Find the path that it specifies. Now rename the folder "nordplate" to whatever you want. I renamed it "scalesplate". And rename Cuirassm_1.nif and Cuirassm_0.nif. You'll need both. Also rename 1stpersoncuirass_1.nif and 1stpersoncuirass_0.nif . Now drag the folder you created into Meshes\Armor in your Data folder.
Go back to "Male Model" and type out the path to the meshes you just dragged. Then go to "Male 1st Model" and type out the path to your renamed 1stpersoncuirass_1.nif.
Click save.
Click again on chests under the Armor tab in the left pane. Find your new item, and right click and then edit.
Go down to Armature Models, click on "NordPlateCuirassAA", and click edit. Now scroll through this new window until you find the armature you created. Once you find it, click OK. Your armature should now be in the box. Click save.
Now go down to Recipes in the left pane, expand it, and click on forge. Scroll down and find "RecipeArmorSteelPlateCuirass". right click, create copy. Rename it. Find your new recipe, and right click, edit. Go to Result Item, and click the " >" button. This will open a new window, scroll down and find the item you made, it should be highlighted in green. Click OK.
Now you can edit what items are required to make this recipe. You can also decide what smithing perk is required to make it by clicking on the box beside "conditions". After you've made your desired changes, click save.
You can also make your armor upgradeable, following the same guidelines as creating a forge recipe. Under "Recipe" in the left pane, click on "Armor Table", and find the corresponding file that matches. Now right click, edit, and click on ">" by "Result Item" and choose your created armor. change what items you want to upgrade it, change the conditions if you want, and click save. Thanks to Tantalus010
Now go up to File, Save As, and name your esp. Make sure to save it to your DATA folder.
Now, find the textures that you are using. In my case it was Razor Scales textures. You will have to rename these, or they will replace the textures for nordplate armor as well, which would defeat the purpose.
So rename the "steel plate" folder to something else. Now go into the folder and change the name of the files in here. Make sure to keep them the same, for example, nordplateglovesf.dds and nordplateglovesf_n.dds should have the same name, like razorglovesf.dds and razorglovesf_n.dds. Do this for all the files.
Now drag the folder into textures\armor in your DATA folder.
~~~~~~~~~~~~~~~~~~~~~~~~~~~~~~~~~~~~~~~~~~~~~~~~~~~~
Now open Nifskope.
Find the cuirass mesh you made earlier, and open it. In the right pane, you will see a 3d rendering of the armor.
In the Top left, you will see > 0NiNode. Expand it.
Now expand NiTriShape.
Now expand BSLightingShaderProperty.
You will see BSShaderTextureSet, click on it.
Now in the bottom pane, you will see >Textures. Expand it.
You will see the paths to the textures this mesh uses. So double click on the first path, and enter the path to the texture you want to use. Now click on the second path, and enter the path to the texture with _n.dds. Leave the last two paths as they are, since these were not included in Razors textures.
Make sure to open both _0.nif and _1.nif and change the filepath to the correct textures.
If the armor you are using has cubemaps, or an _m.dds, make sure to replace it.
Now go to File, Save As, and overwrite the .nif.
Now you can load up Skyrim, making sure to activate your .esp in Data Files first. So you can now go to the forge, and find your new armor recipe and make it, and see if it worked. You can also use the console to add it to your inventory. Use the help command. So help "whatever you named the cuirass" 4.
So you now have the first piece of your armor in the game, all you need to do now is start the tutorial over, replacing the rest of the items, Gauntlets, Boots, Helm.
After you've gone and added all the pieces using BSA Browser, Skyedit, and Nifskope, you can load up Skyrim and forge your new stand alone armor.
~~~~~~~~~~~~~~~~~~~~~~~~~~~~~~~~~~~~~~~~~~~~~~~~~~~~~
Thanks to Zerofrost for making amazing Texture Replacers, as well as all the modders who take the time to make our games better.
Thanks to the creators of Skyedit, FOMM, and Nifskope.