There are a lot of things to know that aren't "obvious" when you first publish a mod and this tutorial aims to help you find the information you need to give your "followers" the best experience possible.
Permissions and credits
Credits and distribution permission
Other user's assetsAll the assets in this file belong to the author, or are from free-to-use modder's resources
Upload permissionYou are not allowed to upload this file to other sites under any circumstances
Modification permissionYou must get permission from me before you are allowed to modify my files to improve it
Conversion permissionYou are not allowed to convert this file to work on other games under any circumstances
Asset use permissionYou must get permission from me before you are allowed to use any of the assets in this file
Asset use permission in mods/files that are being soldYou are not allowed to use assets from this file in any mods/files that are being sold, for money, on Steam Workshop or other platforms
Asset use permission in mods/files that earn donation pointsYou must get permission to earn Donation Points for your mods if they use my assets
Author notes
This author has not provided any additional notes regarding file permissions
File credits
This author has not credited anyone else in this file
Donation Points system
This mod is opted-in to receive Donation Points
Changelogs
Version 1.0.2
- Minor changes to fit the new character limit on mod pages
Version 1.0.1
- Minor changes - Changed the path for all images following the move of Nexus sites to a cluster
Version 1.0.0
- Initial release to public
Version 0.2.0
- Added the "Register your mod to the Nexus site" section - Added the "The mod managing screens" section
Version 0.1.0
- Alpha release - Added the table of contents section - Added the introduction section
Table of contents 01. Introduction 02. Register your mod to the Nexus site 03. The mod managing screens 04. The "Edit attributes" screen 05. Editing the descriptions 06. Add changes to the "Change log" 07. Upload your images 08. "Posts" section 09. "Forums" section 10. Tag your mod 11. Packaging your file for the NexusModManager 12. Create a custom installation script for the NexusModManager 13. Upload your files 14. Publish your mod
01. Introduction There are a lot of things to know that aren't "obvious" when you first publish a mod and this tutorial aims to help you find the information you need to give your "followers" the best experience possible.
I know this tutorial may seem too long to read and overly complicated, but it's not the case. After reading it once, you'll realize you already assimilated 90% of it without even trying. You will eventually consult this guide only for the last 10% because everything else is really easy once you know it.
Although most of this tutorial is basically a step by step of how to publish a mod, I will also give some opinions along the way. Keep in mind those are my own personal preferences [PP], ultimately you're the one who will have to decide which parts of this tutorial applies to you and which don't.
I suggest you have a look at the HTML version of this page. It offers some commodities the Nexus can't. You'll also find the HTML version of my other mod pages on the same site.
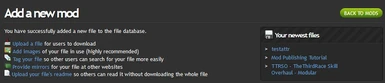
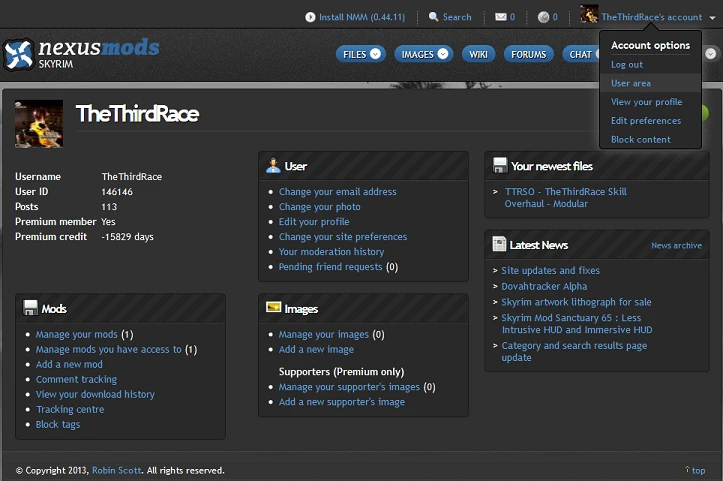
02. Register your mod to the Nexus site First, you must log into your account on the Nexus site. To register your new mod, you simply need to click on your username at the top of the page and select "User area" in the drop-down menu. This will bring you to your user page, the picture below is how mine looks.
In the section "Mods", click on the link "Add a new mod" and this will lead you to the registering form.
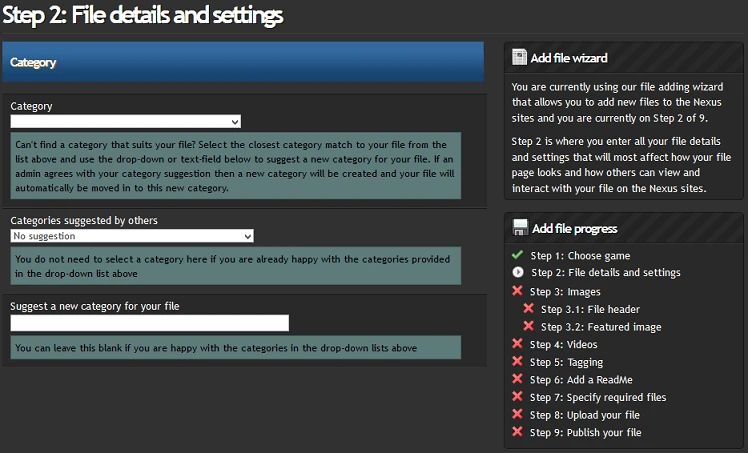
First, let's talk about the new publishing wizard functionality. As you can see at the right side of the image above, there's a step by step wizard guiding you thru publishing your mod. While it funnels you on the right path, it won't give you all the information you need to publish your mod. Thus, this tutorial will provide you that missing information so you can fill in the blanks.
With that out of the way, you shouldn't have any problem to fill in the information in the image above as it's pretty self-explanatory. So let's continue with the mod information.
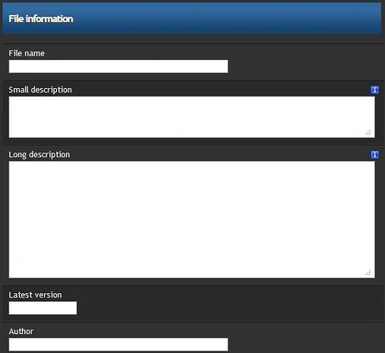
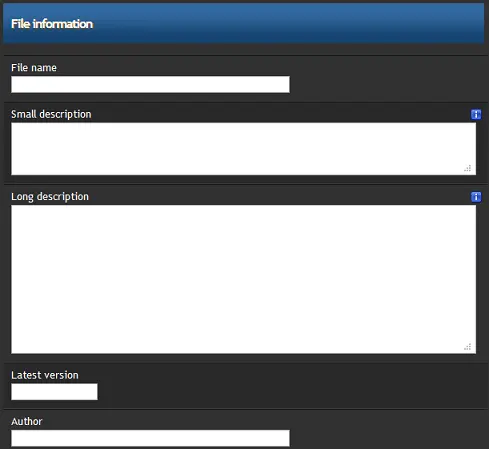
It's important to remember that everything you write here can be changed later so you don't have to go all OCD filling the form. The "File name" is your mod's name and I'll be covering the small and long descriptions in the chapter "Editing the descriptions" of this tutorial. You can hover your mouse over the blue "i" for more information.
[PP]: The version number is used many times in your mod page and it's always sorted alphabetically. Thus, use a decent and logic numbering scheme for your version and stick to it. Something like "1.0.0" will give you all the latitude you need. If your mod is in ALPHA, set the version to something between "0.0.1" and "0.5.0". If your mod is in BETA, set the version to something greater than "0.5.0" and below "1.0.0". The first release that isn't "experimental" should always be "1.0.0", there's nothing more absurd than a perfectly usable mod stuck below version "1.0.0". Don't be shy to use the last number for quick fixes, the middle one for new features and the first one for big changes.
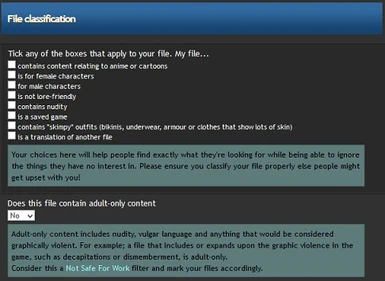
The "File classification" information aims to avoid unfortunate "encounters" with things people might not wanna see. Even if there's a couple options, the real aim of this information is to tag the nudity/skimpy mods so they can be filtered out from search results. There's a "tag" chapter we'll cover later but since mod authors were notoriously bad at tagging their own file, this information serves as a fail-safe and reminder.
[PP]: Don't worry about "trimming" your audience. If people went out of their way to filter out your mod, it's because they don't want to see it. Going against their will is a lose/lose situation as you don't want tons of complaints filling up your inbox and your mod page. You certainly don't want moderators on your back either.
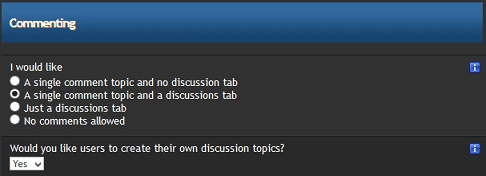
You have to be careful about your choice in the "Commenting" section because the options aren't very clear. To make matter worst, if you choose option #4 you'll have to contact an administrator if you change your mind... The "single comment topic" means the "POSTS" tab and the "discussions tab" means the "FORUMS" tab. So by looking at the image above, the real options you have are:
Just a "posts" tab
Both, a "posts" and a "forums" tab
Just a "forums" tab
None
[PP]: I would suggest you use the second option, meaning you want both a "posts" and a "forums" tab. This will allow people to simply comment on your mod in the "posts" tab while you can use the "forums" tab to steer the conversation in a specific direction like "bugs", "troubleshooting" and "suggestions".
The drop-down menu is about the "forums" tab. If you answer "Yes", anyone will be able to create a new subject. If you answer "No", you'll be the only one able to do that.
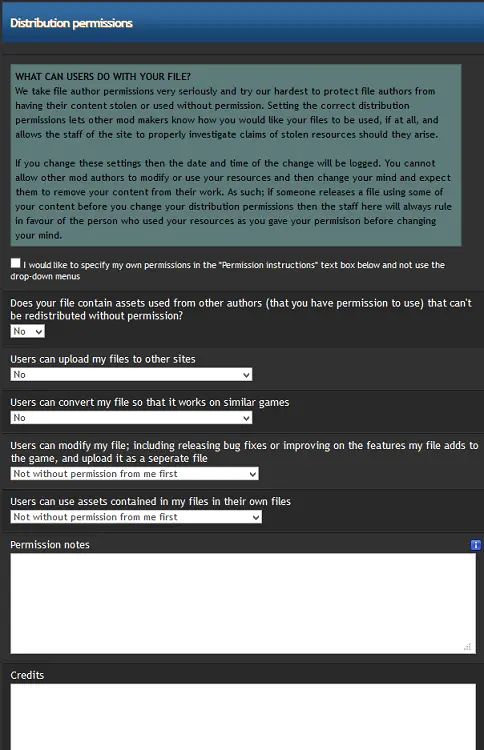
Again, everything in the picture above is self explanatory. If you have any doubts, just hover your mouse over the blue "i" for more information. Beware, the field that allows you to give editing permissions to another user doesn't work at all, don't waste your time.
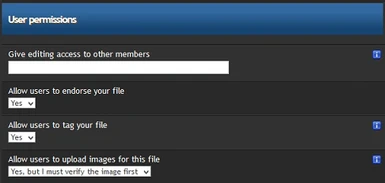
In this section, you need to decide what a user is allowed to do with your mod. The site already covers the common permissions with the drop-down menus, but you can also add anything you want in the "Permission notes".
The checkbox at the top of the section allows you to ignore the drop-down menus and only fill the "Permission notes" text box. In that case, when you click on the icon for permissions in the mod page, you will only see the "Permission notes" you wrote, you won't see anything else.
You also have the option to list your "Credits" section here instead of doing it in your mod page.
[PP]: Personally, I feel credits are better served directly in the mod page than hidden away in a pop-up window. Hidding permissions is ok because it doesn't concerns "normal" users, but credits are a way to advertise some authors, mods and tools that wouldn't get the attention they deserve otherwise.
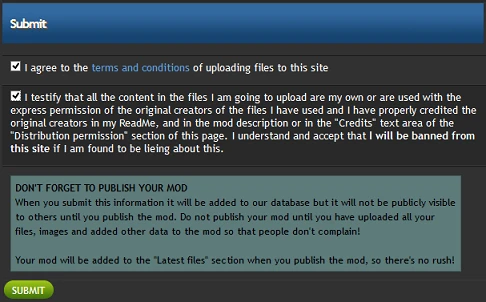
Pretty simple here, just read the warnings and check the 2 checkboxes.
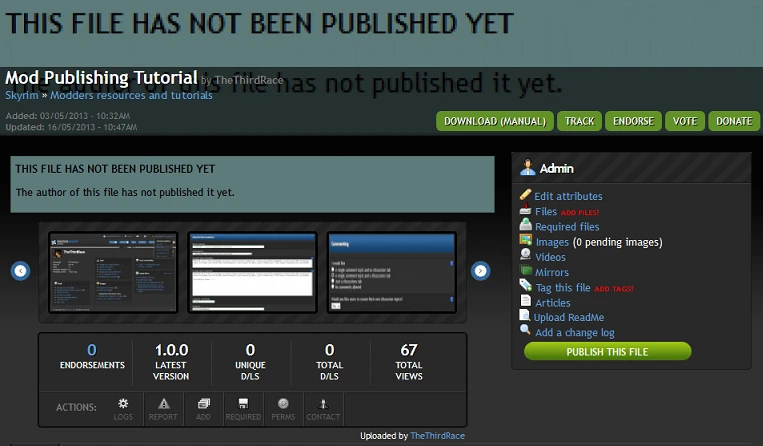
Before hitting the "Submit" button, you need to know this only register the mod on the Nexus site, it doesn't make it available for public view. That means that nobody will see your mod unless you "publish" it. Refrain from publishing your mod until your mod page is ready, you have all the time in the world. And don't worry about the "Latest files" section on the front page because this only advertise newly published mods, which means as long as you don't publish yours, you're not penalized.
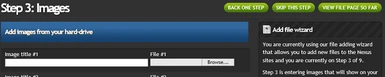
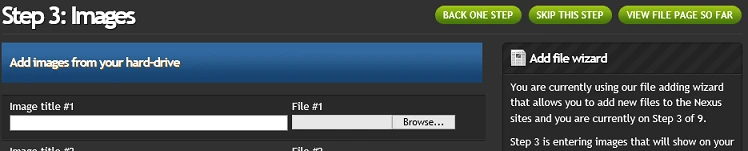
Hit the "Submit" button to register your mod and you'll be redirected to step #3 of the publishing wizard:
Now you have 2 choices, you can either continue with the steps of the publishing wizard or you can click on the green "VIEW FILE PAGE SO FAR" button. This tutorial isn't gonna cover the remaining steps of the wizard because you're gonna have to do a lot of back and forth while editing your mod page and I feel the wizard is less appropriate for this kind of thing.
[PP]: I also wrote the whole tutorial before the wizard was introduced... You can still use everything I cover in this tutorial to help you fill in the information for the wizard if you wish to go that way.
So just click on the green "VIEW FILE PAGE SO FAR" button at the top right to finally get to the managing screen.
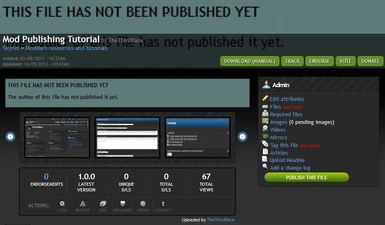
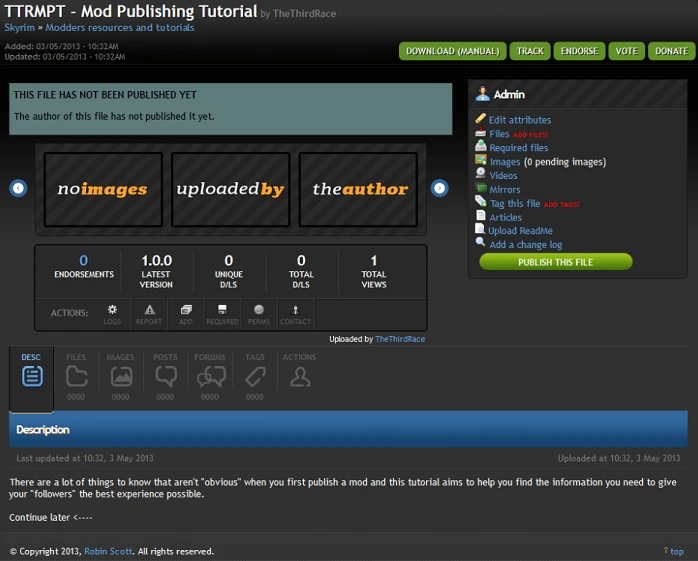
03. The mod managing screens There are 2 centralized screens to manage your mod. I won't elaborate on the content of those managing screens for now because we're gonna cover them later, but you need to remember how to get there.
The first managing screen is your mod page. If you just registered your mod on the site and clicked the green "VIEW FILE PAGE SO FAR" button, you'll be redirected to this screen:
You have to be logged in to see the managing section on the left. If you're not logged in, your mod page will look like any other mod page on the site.
To get to your mod page at a later date, you can:
Bookmark it
Click on the mod name in the second managing screen (more on that just below)
Click on the "Notifications" icon in the top right corner and then click on your mod link in the "LATEST FILE COMMENTS" section
Use the search option
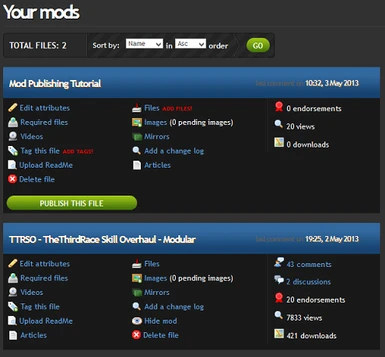
The second managing screen will list all your mods, making it handy to manage more than one at once. To get there, just click on your user name at the top right of the site, click on "User area" and then click the "Manage mods" link in the "Mods" section to see this screen:
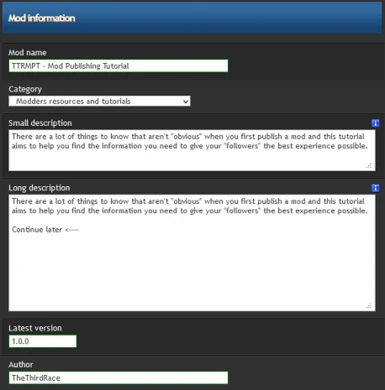
04. The "Edit attributes" screen The "Edit attributes" screen is basically the same screen you filled when registering your mod with a couple changes to reflect the fact you're now editing your mod instead of creating it. This screen can be accessed by clicking on the "Edit attributes" link of any managing screens.
The "File information" section is mostly used to edit the short and long descriptions, but I will cover those in the next chapter of this tutorial. You can also update your mod's version number so the NexusModManager can alert players when you update your mod. Finally, there's also a new option to hide your mod from public view and the possibility to explain why you did it. This option only applies if you already published your mod and should be used as a temporary solution, not a permanent one. If you want to permanently remove your mod from the Nexus site, you should use the "Delete file" link in the principal managing screen instead.
There's no need to cover the remaining sections of this screen as they're the same you filled when you registered your mod.
When you're done editing, just click the "Submit" button to save.
05. Editing the descriptions Your mod has 2 kind of descriptions: the short and the long one. Both can be edited by clicking on the "Edit attributes" link in any of the managing screens.
The short description is the small summary of your mod that appears in the search results and the "Latest files". It only has a 350 characters limit and doesn't offer any real way to customize the layout of your text except doing some paragraphs.
[PP]: The short description is the gateway to your mod, it's what should strike the interest of people so you should always strive to make it as appealing as possible. There are dozens of new mods every day, if you cannot be bothered to write something of quality, what does it say about the quality of your mod?
The long description is the text you'll see on your mod page, what you're reading right now is the long description of my mod. For a full example of a long description, you can download this mod's long description in the FILES tab.
In your mod page, you can write as many sections as you want but there are 3 sections that should always be there. The first of those 3 sections should be an introduction explaining clearly what your mod does and what it doesn't. The second section should be an installation and requirements procedure. The last section should be the credits if you have any. The first 2 sections will give people a quick glance at what they need to know to use your mod while the last one will pay respect to your fellow modders.
[PP]: Those 3 sections should be laid out in that specific order because it's the natural chronology. I strongly suggest you order your sections from the most to the less valuable to people. Everyone that visits your page wants to know what your mod does so it's logical to put your introduction at the very top of the page. Since not everyone will be interested in your mod, it makes sense to put the installation and requirements section somewhere in the middle of your page. The credits section will be valuable to only a handful of people, so it should naturally come toward the bottom of your page.
[PP]: You're free to write whatever you want on your mod page, but you should always give as much details as you can because people will judge your mod on what you wrote. As I said with the short description, there are dozens of new mods every day, if you cannot be bothered to write something of quality what does it say about the quality of your mod?
[PP]: If you don't want to give away spoilers, there's always a way to explain what your mod does without resorting to cryptic messages nobody understand. Time is precious to most people and they have no problem spending time in-game trying to figure out how to solve your quest or puzzle because they're there for that, but they don't want the same principle applied when they read the description of your mod. They want to know what to expect from your mod, they don't want to solve a riddle or install your mod just to understand what your mod does. The same can be said about books. People have no problem spending a week to read a book because they're there for that, but they're not willing to spend as much time just to decide whether or not the book will appeal to them... that's what the back cover summary is for. Your long description is the book's back cover summary.
[PP]: If you have problems to write correctly in English because it's not your native language, just let us know in your introduction. People will be more lenient to let it slide when they know the reason why your text might not make sense sometimes. It's all about presentation, if you're upfront with your lack of knowledge in English, you're usually good to go.
Back to the subject, as you can see the long description isn't as limited as the short one. The secret behind all this is BBCode. BBCode is a markup language like HTML but much more limited, meaning you won't be able to manage your page as much as you'd like. I would gladly point you to a BBCode tutorial, but reality is the BBCode this site support isn't the full available BBCode. So the next best thing is to show you which ones are confirmed to work and tell you what you can expect using them.
Before giving the codes, you should know how they work. BBCodes are a set of 2 tags, the first one state the intent and gives the start point while the second one gives the end point. The end point code is always the same as the start code minus the "intent" but with an added "/" to indicate it's the end point. It's gonna be clear as soon as you'll see example, but since the codes are interpreted by the site, I will have to add spaces in the tags so you can actually see them. When you use the codes, you need to remove those spaces if you want to make them work.
The codes can also be combined for multiple effects, but the start and end points must always be in a "last opened = first closed" order. See the examples below to understand what will work and what won't:
Good -> [code #1][code #2][/code #2][/code #1]
Good -> [code #2][code #1][/code #1][/code #2]
Bad --> [code #1][code #2][/code #1][/code #2]
Bad --> [code #2][code #1][/code #2][/code #1]
So here are the codes:
[ b ]Bold[ /b ] -> Bold [ u ]Underline[ /u ] -> Underline [ i ]Italic[ /i ] -> Italic [ s ]Strikethrough[ /s ] -> Strikethrough [ size=3 ]Size 3[ /size ] -> Size 3 [ font="Impact" ]Impact Font[ /font ] -> Impact Font
Just a note about the "font" tag. The font must be present on the computer reading your mod page otherwise it won't work. You are pretty safe if using one of those fonts: Arial, Arial Black, Arial Narrow, Book Antiqua, Century Gothic, Comic Sans MS, Courier New, Franklin Gothic Medium, Garamond, Georgia, Impact, Lucida Console, Lucida Sans Unicode, Microsoft Sans Serif, Palatino Linotype, Tahoma, Times New Roman, Trebuchet MS, Verdana.
[ color=#ffff00 ]Color[ /color ] -> Color [ color=green ]Color[ /color ] -> Color The color can be specified by name or with it's hexadecimal number. The hexadecimal numbers works by giving a value for each basic color that compose the color you want. Those are called "RGB" (Red Green Blue) colors and are widely used in HTML. Check out this site for a great tool to help you find the code you're looking for.
[PP]: Choose colors that are readable for crying out loud!!! Use colors that aren't aggressive to the eye and have a great contrast with the background, not something like this... Remember that each screen has its own color calibration, so if you are using colors that are "borderline", you might make it unreadable for someone else.
[ center ]Text aligned in the center[ /center ] Will align the text or image in the center like shown below:
Text aligned in the center
[ right ]Text aligned to the right[ /right ] Will align the text or image to the right like shown below:
Text aligned to the right
[ heading ]Heading[ /heading ] Will act as a "title" with a line that span the entire page width like shown below:
Heading
This code already include an automatic line feed, so don't put a blank line after it or you'll see 2 blank lines on your page.
[ line ] Will draw a line that span the entire page width like shown below (it's the only code that doesn't need an "end point"):
This code already include an automatic line feed, so don't put a blank line after it or you'll see 2 blank lines on your page.
[ code ]Example of code[ /code ] Will show the text with a fixed font (every character as the same width) like shown below: Example of code
[ quote ]Example of quote[ /quote ] Will show text in a "quote" format like shown below:
Example of quote
This code already include 2 automatic line feeds, so don't put a blank line after it or you'll see 3 blank lines on your page.
[ list ] [ * ]Item 1 [ * ]Item 2 [ /list ] Will make unordered lists (no number) like shown below:
item 1
item 2
This code reacts very inconsistently. The start point ([ list ]) will not count as a line feed. If you don't have anything else on that line, the site engine will start the list immediately so you need to put a blank line yourself if you want to see some space between the start of the list and the paragraph above. On the other hand, the end point ([ /list ]) will always count as a line feed no matter what, so you don't need to put one yourself or you'll have 2 line feeds when you intended to only have 1 blank line.
Forget about "ordered" lists, they aren't supported.
[ url=http://skyrim.nexusmods.com ]Skyrim Nexus[ /url ] Will include a link to any web page you want like shown below: Skyrim Nexus
[PP]: I beg you, use this URL code!!! I'm really tired of having to copy paste a link because the author couldn't be bothered to do it correctly. Remember this, every time you take a shortcut, it saves time only for you while it waste the time of everyone else.
[ img ]http://static-2.nexusmods.com/15/mods/110/images/thumbnails/35567-1-1367606349.png[ /img ] Display the image at the specified URL like shown below:
The link to your image can be any valid URL. You can point to your favorite image service like photobucket and flickr but keep in mind that if you delete your images there, you will delete them from your mod page too. To avoid this kind of problem, you can upload your own images to this site (we'll cover how later) and use those in your mod page. That way, you're absolutely sure you will never delete them by mistake. Once uploaded to your mod page image area, all you have to do is click on the image to see it in it's full size and then right click on it to find the URL (check the image location or the properties). If you right click on a thumbnail, you will have the URL of the thumbnail which can be pretty sweet and this is what you see in my example here.
Be careful, the [ img ] code doesn't resize your image, so you'll have to select your image with the right size from the get go.
[ youtube ]Hm3KIgMPEaA[ /youtube ] Display the youtube video at the specified URL like shown below:
The [ youtube ] code doesn't need the full adress, you only need the movie ID (after the "v=" in the URL).
06. Add changes to the "Change log" A change log is very useful to help people keep tracks of all the changes you make to your mod.
[PP]: Avoid cluttering your mod page long description with a change log. Especially when authors put the change log at the very top of their mod page... Nobody wants to scroll thru 30 lines of change log that make no sense to them right now before they finally reach your mod description. There's a section just for the change log, freaking use it!
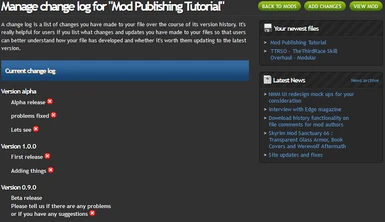
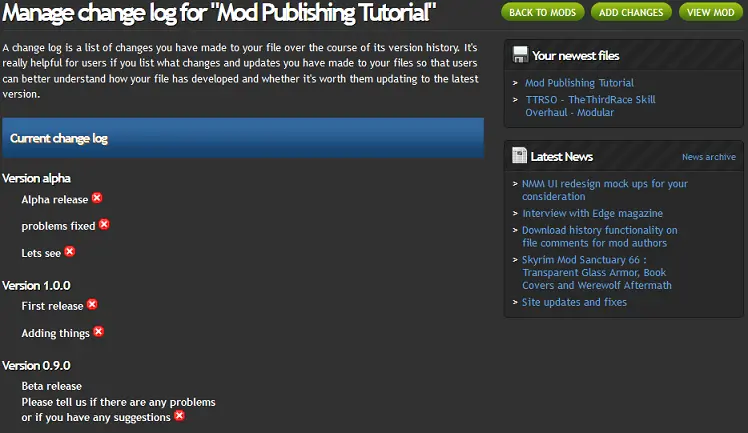
To manage the change log, just click on the "Add a change log" link in any of the managing screens. This will bring you to a new screen where you'll see all the changes you wrote (if any) since the beginning of your mod.
[PP]: As you can see in the image above, this is a great example of why I strongly advise using a logic numbering scheme for your version and sticking to it. Using a bad version number like "alpha" will top the change log but it should logically go below version 0.9.0. I know I'm hammering my point thru your tick skull right now, but after reading the entire tutorial you will realize this has an impact in other chapters too. Better solve your problem now than cry later...
If you want to delete an entry of the change log, simply click on the red "x" to delete it.
Since there's no edit function for the change log, the only way to update or remove the text is to delete the entry you want to update and then add an entry with the updated text. It might be wise to add the new entry first and then delete the old one so you always have a backup if something bad happens.
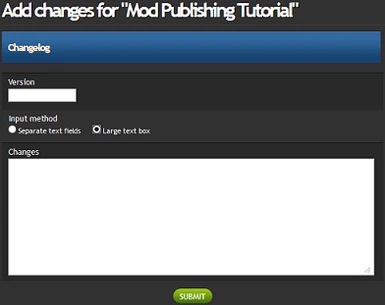
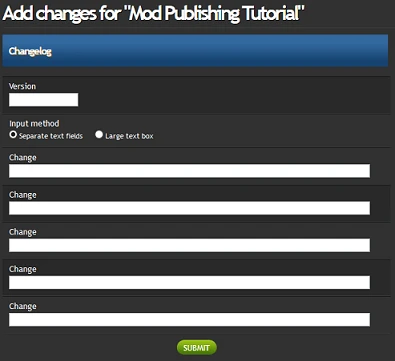
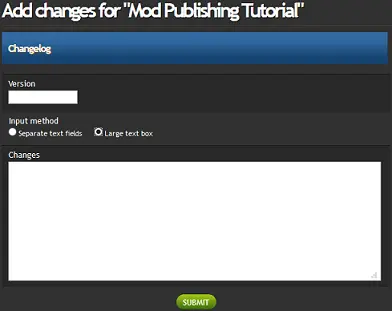
To add an entry, click on the green "ADD CHANGES" button at the top right. You'll see one of those 2 screens depending on which option you select: "Separate text fields" or "Large text box".
The "Separate text fields" option allows you to enter each change as a separate entry, meaning each change will have its own delete button in the managing screen. On the plus side, you can manage each change without affecting anything else, but the downsides are that everything is sorted "randomly" and you can't do anything to modify the order or the layout.
The "Large text box" option allows you to enter all your changes as a single block, meaning you will have only 1 delete button in the managing screen for the entire block of changes. On the plus side, you can sort every changes in a block however you see fit and you can even do a little layout. The downside is that every time you want to change something you need to copy/paste the entire block of changes and then do your modifications.
Nothing prevents you from creating 2 blocks of changes using the "Large text box" option, but those 2 blocks will have the same problems as the "Separate text fields" option, meaning that while the text of each block will stay in the same order, the 2 blocks will be displayed in a random order. You basically get the downsides of the 2 options combined without getting the plus sides of either...
[PP]: Personally, I wouldn't even bother with the "Separate text fields" option because it lists changes in a random order. It's already pretty difficult to read the change log without any colors, no need to make it worst than it already is.
Once you're ready to save those changes, simply enter the version number they relate to and click on the green "SUBMIT" button to return to the change log managing screen.
Check the change log tab on this page to see what I did with the "Large text box" option. It's far from perfect, but it's much better than the run-of-the-mill mod. An even better example can be found here.
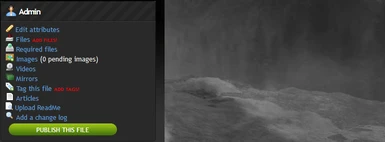
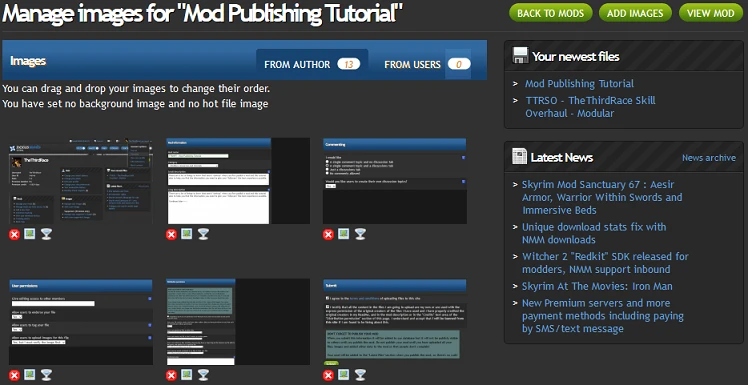
07. Upload your images To manage your mod page images, just click on the "Images" link in any of the managing screens. This will bring you to a new screen where you'll see all the images you uploaded (if any) in your image section.
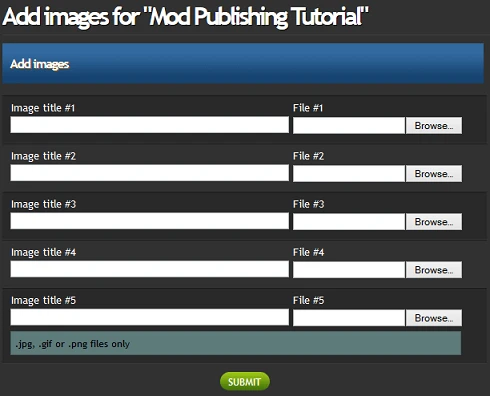
To upload a new image, simply click on the green "ADD IMAGES" button and this will bring you to this screen:
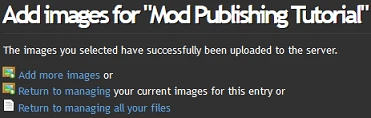
The screen above is pretty straight forward. The descriptions are optional, but if you enter something you will see the text appear when you hover your mouse on the image in the "IMAGES" tab of your mod page. Simply select the images you want to upload and click on the green "SUBMIT" button. This will bring you to this screen:
You now have 3 choices. The first choice is to add more images, which allows you to repeat exactly what we just did. The second choice will bring you back to the image managing screen. The third choice will bring you back to the principal mod managing screen. Click on the second option to manage your images.
Now that you have at least 1 image in your image section, what are your options?
You can "drag and drop" images to order them however you wish. The first image will always be the one you'll see in the search results, it will also be the first displayed in the image section and in the thumbnails on your mod page.
You can delete them by clicking on the red "X" below the images.
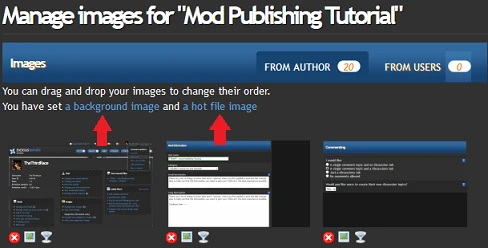
You can modify your mod page heading image by clicking on the small computer screen icon "Use in background". This will bring you to a new screen that will allow you to select the image's section you want to use as "background". The top of the screen is the preview of how it's gonna look and the bottom is your original image. Simply follow the instructions and crop your original image however you see fit. When you're satisfied with your selection, just click on the save button. When you refresh your mod page, you're gonna see your new image in the background behind your mod title:
The last thing you can do in the image managing screen is to set your "Hot file" image. To do that, just click on the small martini glass icon "Use in hot files image" under the image you want to use. This will bring you to the same screen as for the background image. Crop the image, save and you're set.
Remember, you can change your images whenever you want. The "hot files" and "background" images are no different. To remove your "hot file" image, just click on the link "a hot file image" in the image managing screen and then click on the remove link. You can do exactly the same with the "background" image.
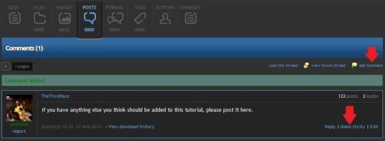
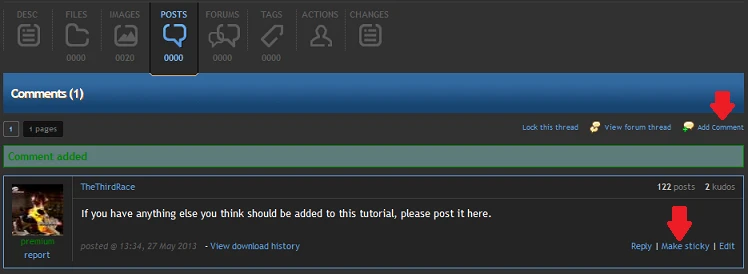
08. "Posts" section This section is where the majority of people will leave comments about your mod. You'll be able to post replies to people's comments and create new comments on your own. I'll spare you the details, anyone that used the Web in the last decade should be able to navigate this section.
On the other hand, there is 1 feature worth mentioning: sticky posts. The sticky post will always be displayed on the comment's first page and will have a red border to indicate it's importance. It's a great opportunity to deliver news and instructions to posters.
To create such a post, simply click on the "POSTS" tab and then click on the "Add Comment" link. Enter your comment and click on the green "Submit" button.
Now that your post is created, simply click on the "Make sticky" link to save it as a sticky post.
As you can see, once your post is a sticky, you still have a couple options. "Un-stick" will return your post to a normal post. "Lock" will prevent people to reply to that particular post, but they'll still be able to post comments. "Reply" and "Edit" are self-explanatory...
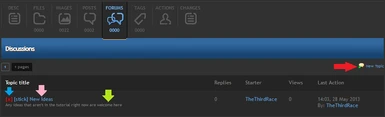
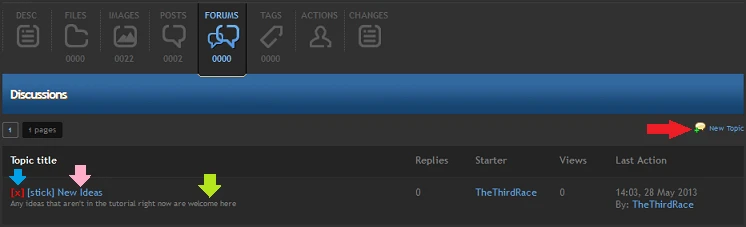
09. "Forums" section This section basically follows the same logic as the "Posts" section, but with multiple "subjects". Again, anyone that used the Web in the last decade should know how to navigate this section, so I'll spare you the details.
To create a topic, simply click on the "FORUMS" tab and then click on the "New Topic" link.
The "Subject" will be the title of your post and can be seen where the pink arrow points at. The "Topic description" is the text you see where the green arrow points at. Finally, the "Post" is the text of your own post in the forum because you can't just create a topic without a post in it. It's important to mention that the "Subject" and the "Topic" description" can't be edited after creation. When you're ready, click on the green "Submit" button.
Now, the important concept to remember here is the difference between a topic and a post. When you click the first time on the "FORUMS" tab, you see all the topics. You need to click on a topic to see its posts.
As such, you can make your topic a sticky but this will not affect the posts in it. To make your topic a sticky, simply click on the "[stick]" link between the blue and pink arrows. To undo your changes, click on the "[unstick]" link that replaced the former "[stick]" link.
You can also delete an entire topic by clicking on the "[x]" link below the blue arrow.
Now click on your topic and you will see a familiar interface. The "post" mode works just like the "Posts" section does, meaning you can edit, make a sticky post, lock a post, etc.
There are 2 new links at the left of the "Add Comment" when you're in "post" mode.
The "Lock this thread" link will disable the "Add Comment" link so no one will be able to add new posts to the topic. You can undo your changes by clicking on the "Unlock this thread" link that replaced its counterpart.
The "View forum thread" link will redirect you to your own topic on the Nexus site forums, meaning it will be a completely different interface and people won't be on your mod page anymore. I advise to ignore this link since it serves no purpose for this tutorial.
Once you're done with your post, you can go back to the topics by simply clicking again on the "FORUMS" tab.
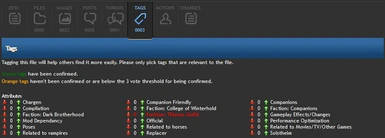
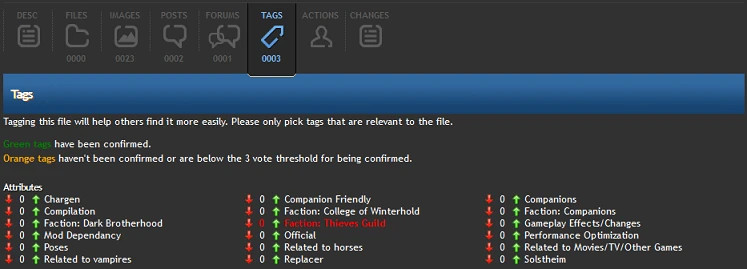
10. Tag your mod Tags are pre-defined words to categorize your mod and make it easier for people to find with the "search" feature. To manage your mod's tags, just click on the "Tag this file" link in any of the managing screens or simply click on the "TAGS" tab.
To "tag" your mod, simply click on the appropriate green arrow. Any mistake can be corrected by clicking on the orange arrow.
[PP]: Personally, I never used such a feature and I highly doubt this is a popular one. On the other hand, it will take you 10 seconds of your time so you might as well do it.
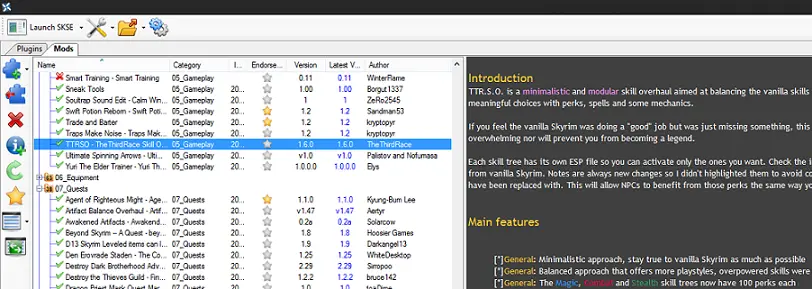
11. Packaging your file for the NexusModManager Packaging your mod for use with the NexusModManager (NMM) is really simple. I'll use my TTRSO mod to explain it to you.
First, let's examine the structure of my mod. Right click on the archive of my mod and select the option "Extract to TTR_Skill_Overhaul". Open the TTR_Skill_Overhaul folder when extraction is complete and you will see this: fomod/ Scripts/ Source/ TTR_Reset_Module.txt TTR_Skill_Overhaul.esm TTR_Skill_Overhaul_Alchemy.esp ... TTR_Skill_Overhaul_Alteration.esp ... TTR_Skill_Overhaul_Speech.esp
As you can see, the archive's structure is made so you could manually install the mod by extracting the files in your "SkyrimData" folder. Why is that? First and foremost, not everyone will use the NMM so you have to cater to these users too. Second, mod managers like NMM only offer more options but their main tasks are to extract your archive in the "SkyrimData" folder and save the users the hard work. So it doesn't really matter if you install the mod manually or with a mod manager, the files need to be in a structure that can be extracted directly in the "SkyrimData" folder.
You could use a different structure, but that would require the users to perform extra steps to manually install your mod or you would have to provide a custom installation script for the chosen mod manager (more on that later).
[PP]: It's also a common misconception to think you need to put your files under a "Data" folder in the archive. The only reason it works is because older mod managers didn't take a stand back then and the situation got out of hand with thousands of mods packed "incorrectly". In order to support those older mods, the creators of NMM found it easier to patch the bad behavior than repackage them all. By avoiding the use of a "Data" folder, it's also easier to manage the archive with your archiving program. When you extracted my mod, I told you to extract to a specific folder for a reason. When you select all my files under the "TTR_Skill_Overhaul" folder and you right click on them, your archiving program will suggest to package all the files under "TTR_Skill_Overhaul.7z" (could be another extension) instead of "Data.7z". This makes things a lot easier to manage for everyone when the structure of your mod is simple and clean. It's also very hard to search for a specific archive in the NMM mod folder when they're all named "Data.7z", "Data(1).7z", "Data(2).7z"...
[PP]: Be sure to avoid version numbers in your files name (ESP/ESM) as the game saves this information within savegames. Failing to comply with this humble request might result in broken scripts, broken quests, unintended bugs and insults (up to death threats) from angry users... For the same reasons, once you publish your mod you can never change the name of your files (ESP/ESM) again. So think twice before using a dumb name as you'll be stuck with it till the end of times...
A lot of authors also make the mistake of forgetting to include their scripts in the archive of their mod. Don't do that! Remember to grab the PEX files under the "Scripts" folder. If you're extra generous, you can also include the source files of your scripts that are located in the "ScriptsSource" folder as PSC files.
[PP]: Please, help your fellow modders by including the source of your scripts in your archive. I wouldn't have been able to do my own mod without examples of how to do certain things and all of this has been possible because some authors were very generous by providing their source files. The community has given you plenty, please consider giving back in return.
Now that we've covered the ESP/ESM files and the "Scripts" folder, we need to cover the remaining 2 folders. You can begin by ignoring the "Source" folder as it's only there as "documentation" (source of the ESM file), hence optional. As for the "fomod" folder, it's optional and only required if you want to customize you mod in the NMM. You'll find 2 files in my "fomod" folder...
The first file, "fomod/ModuleConfig.xml", is the custom installation script and I'll cover it in the next chapter of this tutorial. The "fomod/ModuleConfig.xml" is optional and is only required if you want to give options to your users and/or perform specific installation instructions, more on that later.
The second file, "fomod/info.xml", gives NMM all the missing information about your mod. The "fomod/info.xml" file is optional and NMM will simply not display that information if you don't provide it. In any case, I suggest you include this file anyway as it will be easier for users to manage your mod. So let's take a peek at my own TTRSO's "info.xml" file: <fomod> <Name>TTRSO - TheThirdRace Skill Overhaul</Name> <Version>1.6.0</Version> <Author>TheThirdRace</Author> <Website>http://skyrim.nexusmods.com/mods/33860</Website> <Description>Blah bleh blih bloh bluh...</Description> </fomod>
As you can see, it's pretty straight forward and doesn't need much explanation. The most important field is the <Description> one as it's the information displayed in the right pane of NMM. The best feature about the <Description> field is that you can use your mod page long description as is, just copy/paste it in this field and you're good to go. As an alternative, some people prefer to put there the install/update/uninstall instructions only. Beware, any "&" signs will crash the NMM, so don't use them. When done correctly, you should see the description appear in the right pane of the NMM when you click on your mod:
Now that you have all your files in the correct structure, just select them all and right click on them to use your archiving program to package them nice and easy.
[PP]: I would highly suggest you use 7zip as your archiving program. It's free, simple, clean and it's the default option for NMM. Most of all, as proven by a couple benchmarks found over the web, it's the most efficient (time and compression) archiving program publicly available at this time even when pit against paid options. So what are you waiting for?
With your archive in hand, you need to test it with the NMM to see if everything's ok. If anything goes wrong, and believe me it probably will as it's your first time, simply remove the mod from NMM, open the folder where NMM keeps your mod files and clean up any files stuck there. Don't forget to clean the subfolders and restart NMM after it's done. Eventually, you'll get the hang of it and will find it simple to create an archive without errors. So don't give up if it doesn't work the first couple times.
One last thing, some mods cannot be made NMM compatible for the moment. Anything that doesn't install into the "Data" folder will require a manual install. SKSE and ENB mods are directly installed under the "Skyrim" folder making them impossible to install with NMM. I really hope this get handled by NMM eventually as it would provide a simple one stop for everything. Maybe if enough people ask on the forums...
12. Create a custom installation script for the NexusModManager There are 2 types of custom installation script for the NMM: XML or C#.
I won't cover the C# method as it's overly complicated for a novice modder. If you want more information about it, I would suggest you read this guide. The Deadly Dragons mod also has a nice and relatively easy C# custom install script for you to check out. There's not a whole lot information around for this method so brace yourself for a lot of trial and error.
For the novice modder, I highly suggest you stick to the XML method. This method uses the "fomod/ModuleConfig.xml" file to give NMM all the information it needs to install your mod correctly. The "fomod/ModuleConfig.xml" file is optional, NMM will simply extract your mod in the DATA folder if you don't provide more specific instructions. Most of you won't need a file like this, but this is where the magic happens when you need something more "complex".
First, it would be a very good idea to read this guide to learn the basics. It's a bit complicated so don't give up if you understand nothing the first time. Fortunately, you don't need to understand everything in that guide to cook up a basic custom install script.
As in the previous chapter, I'll use my TTRSO mod to explain more about the custom install script. The goal is to understand the basics so you can modify it to your own needs.
Before going further, you should install my TTRSO mod once just to see how the custom install script plays out. What you'll see is 2 screens, one for selecting the DLCs you use and one for selecting the modules you want to install. Those screens are only there to set FLAGS and I use those FLAGS to decide which optional files I'm gonna install. The beauty of that method is that you can put all your optional files in the same archive and install only the things the user really wants.
Ok, now open up my "fomod/ModuleConfig.xml" file and we'll review each sections together... <config xmlns:xsi="http://www.w3.org/2001/XMLSchema-instance" xsi:noNamespaceSchemaLocation="http://qconsulting.ca/fo3/ModConfig5.0.xsd">
I understand absolutely nothing of that section, but what I do know is that it's required to define the file. Let's leave it at that and don't modify anything. <moduleName>TTRSO - TheThirdRace Skill Overhaul</moduleName>
This section is the title of your mod. When you install your mod in NMM, you'll see this title in the installation window. Nothing complicated here... <requiredInstallFiles> <folder source="Scripts" destination="Scripts"/> <folder source="Source" destination="Source"/> <file source="TTR_Skill_Overhaul.esm" destination="TTR_Skill_Overhaul.esm"/> <file source="TTR_Reset_Module.txt" destination="TTR_Reset_Module.txt"/> </requiredInstallFiles>
This section tells NMM that those files/folders are required by the mod. That means that no matter what option I select in the screens, those will be installed. When you specify a folder, everything under that folder will also be installed. <installSteps order="Explicit">
This section tells NMM that the screens ("DLC" and "Skills") must be displayed in the order they appear in the script. This is a weird option, without it all the screens would appear in a random order... Who'd want that? <installStep name="DLC">
This section defines the title of installation window when you'll see the first screen. In my case, the first screen ask which DLC you use so I called it "DLC". <optionalFileGroups order="Explicit">
This section tells NMM that the following options are part of the same optional group and to draw a "frame" to group them together. The "order=" part indicate the options must be displayed in the order they appear in the script. Don't ask why, it's dumb but it needs to be there otherwise they would be displayed in a random order... <group name="DLC" type="SelectAny">
This section defines a "filegroup" with the name "DLC". The "<type=SelectAny>" tells NMM that you can select whatever you want in the options, be it none, all or anything in-between. From the top of my head, there is also a <type=SelectAtLeastOne> to force the user to chose only one option in the group. Consult the guide I asked you to read about the XML method to find out what are the other <type=> available. <plugins order="Explicit">
This section tells NMM that the options must be displayed in the order they appear in the script. No kidding Sherlock... <plugin name="Dawnguard"> <description> <![CDATA[Use the Dawnguard compatible files]]> </description> <conditionFlags> <flag name="Dawnguard">Y</flag> </conditionFlags> <typeDescriptor> <type name="Optional"/> </typeDescriptor> </plugin>
Finally we get to define 1 checkbox! The <plugin name> shows the text of the checkbox. The <!CDATA[...]]> shows the text that will be displayed in the right pane of the installation window. It's a more detailed description of what the option do. Be careful as all the brackets must be there for it to work. The <flag name> is exactly what it sound, the name of the flag we'll use later and the value it has if the checkbox is checked. The <type name> tells NMM the checkbox is optional.
This section is repeated with the same pattern for every option I need to display, in this case "Dragonborn" and "Heartfires".
Now that the first screen is complete, the script just closes the tags and then chain up with the second screen... <installStep name="Skills"> <optionalFileGroups order="Explicit"> <group name="Magic" type="SelectAny"> <plugins order="Explicit"> <plugin name="Alteration"> <description> <![CDATA[Overhaul of the Alteration skill]]> </description> <conditionFlags> <flag name="Alteration">Y</flag> </conditionFlags> <typeDescriptor> <type name="Optional"/> </typeDescriptor> </plugin> ...
I won't go further explaining what is what as this is exactly the same pattern as for the first screen, except it now defines the second screen.
When the second screen is complete, the script goes to the final step of installing the optional files you selected. <conditionalFileInstalls> <patterns>
This section just tells NMM to evaluate the conditions in the <pattern> tags and install the associated files and folder. <pattern> <dependencies operator="And"> <flagDependency flag="Alteration" value="Y"/> <flagDependency flag="Dragonborn" value=""/> </dependencies> <files> <file source="TTR_Skill_Overhaul_Alteration.esp" destination="TTR_Skill_Overhaul_Alteration.esp"/> </files> </pattern> <pattern> <dependencies operator="And"> <flagDependency flag="Alteration" value="Y"/> <flagDependency flag="Dragonborn" value="Y"/> </dependencies> <files> <file source="TTR_Skill_Overhaul_Alteration_DB.esp" destination="TTR_Skill_Overhaul_Alteration.esp"/> </files> </pattern>
That's where the magic comes from. All we did with the 2 installation screens was asking the user what they wanted to install, now's the time to do it. So each <pattern> represent a set of conditions and if those conditions are met, then the script will install the files and folders specified.
In the example above, the 2 different patterns check if we need to install something for the Alteration skill. The tricky part is that you need to cover all possibilities. The first <pattern> checks if the user selected "Alteration" but didn't select "Dragonborn". The second <pattern> checks if the user selected "Alteration" and "Dragonborn". There's an implicit third <pattern> here, you also have to consider the user didn't select any of them either.
If no <pattern> matches the user choices (the implicit third <pattern>), then no file for Alteration will be installed. But if a <pattern> matches the user choices, the <file> tag of that <pattern> will specify the file to install and what name it should have once installed. Remember, the game saves your ESP/ESM filenames in the savegame, so you need to keep the same name to avoid problems. That way, if the user first played my mod without Dragonborn and then buy that DLC, he will be able to upgrade my mod without breaking anything because the Alteration file installed will have the same name as before (TTR_Skill_Overhaul_Alteration.esp). That's a clever way to have multiple versions of the "same" file without causing troubles in-game for your users.
Using that technique, you could have 1 archive with all your optional files inside. That includes textures, meshes, ESP, scripts and everything you can think of. With that technique, you don't need to package 8 different archives to give options to your users, you can tie it all nicely in a simple package.
For more examples of the XML method, don't be afraid to open up the mods that have an installation script. Most of them will use the XML method and studying them will give you new insights on how to do yours. I decided to use FLAGs to do my things, but other authors went in different directions. Use the method that fit for you.
Finally, test your installation script thoroughly. Test every option, test every combination. It's boring to do, but users put their trust in you so rise to their expectations. A small trick I found when testing mine was to sort my folders by "Date Modified" so everything that was installed would be on top, talk about a time saver! Once your custom install script works correctly, you won't have to change it unless you add new files and this should be quick to test.
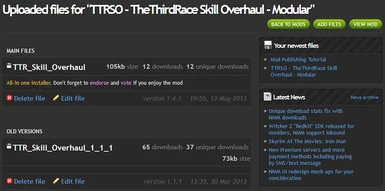
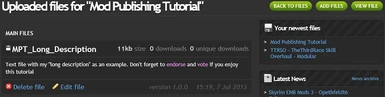
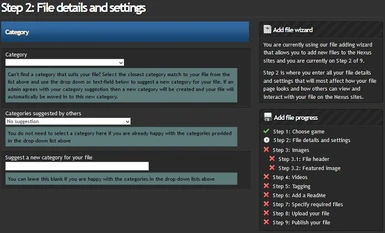
13. Upload your files To manage your mod files, just click on the "Files" link in any of the managing screens. This will bring you to a new screen where you'll see all the files you uploaded (if any) in your file section.
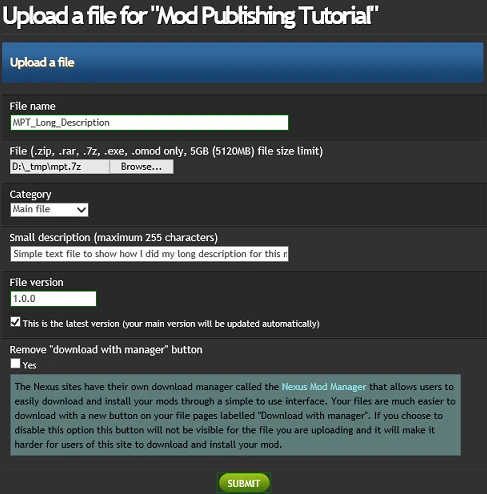
To upload a new file, simply click on the green "ADD FILES" button and this will bring you to this screen:
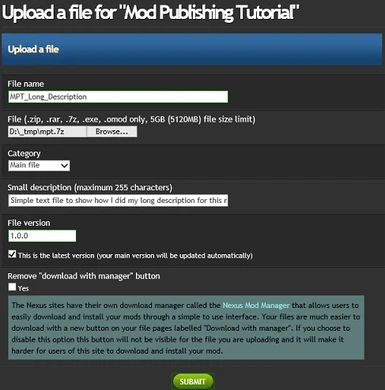
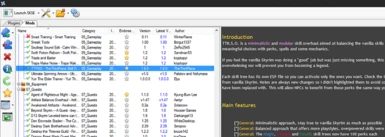
For the file name, anything will do but try to use something that will sort alphabetically whenever you'll add a new update to your mod. Check how I named my files in my TTRSO mod. As you can see, it's much easier to make sense of all my files when they're sorted alphabetically. My example mostly shows files within the "Old versions" category, but the principle applies to all categories.
For the category, you have the choice between 5 types of files. The "Main file" category is used for the files that are essential to your mod. You can have more than one, some people put there the DLC add-ons or different colors for their textures, but I strongly advise you to make a custom NexusModManager (NMM) install script and include everything in 1 file instead. This will make your file much easier to install for NMM users and reduce the cluttering of the file section. The "Update file" category is used for the files that are incremental updates to your mod. Unless your mod exceed 200MB, I strongly advise to avoid this category entirely. If your mod exceed 200MB and decide to have an incremental update file, you should provide an updated main file too. The "Optional file" category is used for files that aren't essential to your mod, but can offer options like alternative textures and DLC add-ons. Unless the size of those optional files is greater than 200MB, I would recommend you ignore this category and include everything in the main file with a custom NMM install script. The "Old version" category is pretty self-explanatory, I would suggest you to keep it to a minimum, but then again I'm a big offender of this rule myself as I like to have a backup somewhere... Finally, the "Miscellaneous" category is for anything that doesn't fit into the previous categories.
For the small description, enter something meaningful and be as clear as possible so people aren't left to guess what they should download. The greatest feature about this description is that it supports the BBCode I explained earlier! That means that you can use colors and if 255 characters isn't enough, you can use an image and fill it to your heart's content!
For file version, just enter the version of your file. I suggest you follow my suggestion to use a decent and logic numbering scheme for your version and stick to it. If you're uploading the latest version of your mod, be sure to check the checkbox to update your mod "latest version" information (this is what the NMM use to determine if there's a new update for your mod).
Finally, be sure to uncheck the checkbox "Remove download with manager button" unless your mod cannot be installed with NMM, which is pretty rare. It's very important for the success of your mod to offer the possibility of downloading with NMM because a lot of users will simply not bother with your mod if it could have been NMM compatible and it's not. Such is the burden of a mod author, you need to please your audience...
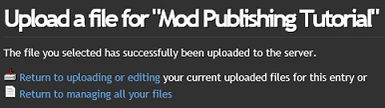
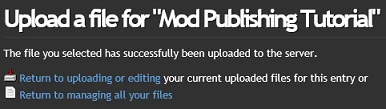
When you're done, click on the green "SUBMIT" button. This will bring you to this screen:
You now have 2 choices. The first choice is to add more files, which allows you to repeat exactly what we just did. The second choice will bring you back to the image managing screen. Click on the first link and we'll see this screen again:
If you want to delete a file, simply click on the appropriate link. As with images, if you want to update the file itself you're gonna have to delete the file and re-upload it, there's no workaround.
Finally, if you want to edit the information of your file (mostly to transfer your files to the "Old versions" category), simply click on the appropriate link and you'll see a this screen:
14. Publish your mod Time to click on that big fat juicy green "Publish" button!
In a few seconds, you're gonna see your file in the latest files for all the world to see. Congrats!