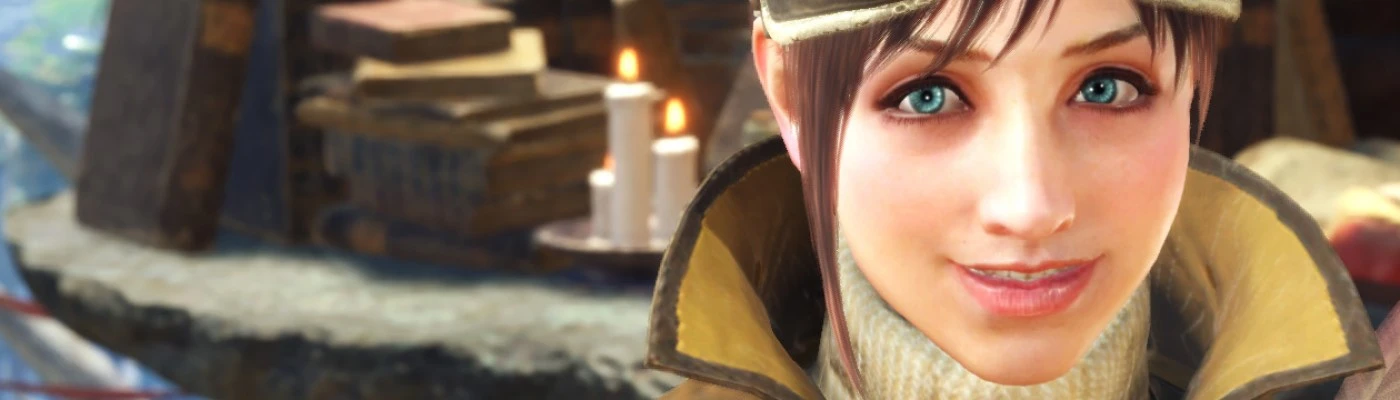
Prettier face texture/normals and optional eye colors for the Handler.
Permissions and credits
Credits and distribution permission
Other user's assetsAll the assets in this file belong to the author, or are from free-to-use modder's resources
Upload permissionYou are not allowed to upload this file to other sites under any circumstances
Modification permissionYou must get permission from me before you are allowed to modify my files to improve it
Conversion permissionYou are not allowed to convert this file to work on other games under any circumstances
Asset use permissionYou must get permission from me before you are allowed to use any of the assets in this file
Asset use permission in mods/files that are being soldYou are not allowed to use assets from this file in any mods/files that are being sold, for money, on Steam Workshop or other platforms
Asset use permission in mods/files that earn donation pointsYou are not allowed to earn Donation Points for your mods if they use my assets
Author notes
This author has not provided any additional notes regarding file permissions
File credits
This author has not credited anyone else in this file
Eye colors don't work after Iceborne patch. Please download the new version here. アイスボーンのパッチ後、目色が使えなくなりました。新しい版をここからDLしてください。
You should still be able to use the textures. テクスチャーはまだ使えるはずです。
Prettier face texture/normals and optional eye colors for the Handler. It's an improvement over my "Cleaner Handler face" mod, but she still looks kinda funky on and off due to her facial animation, the lighting, her 3d mesh, etc. I hope it's okay to post this as a new, separate mod. Note that I've not tested any of these on the Handler's alternate outfits, but they should work.
List of changes (on top of the Cleaner Handler Face changes): - Thinned and raised the eyebrows more. - Added a little eyeshadow. - Made the cheeks and nose a little rosier. - Largened the lips slightly and adjusted the colors to stand out a little more. - Darkened her lower eyelid and sides of the eyes to make her eyes look a little wider/further apart. - Lightened the bags under her eyes. - Smoothed the normal map in various places to make her face look a little cleaner, smoother. - Added several eye color options.
Future plans: - I'd like to try make her front bangs look longer/thicker, but I can't seem to convert hair textures properly right now. - No plans to add more eye colors. It's a huge pain changing the eye color for each outfit.
Installation: Simply unzip the files (with folders) into Steam\Steamapps\common\Monster Hunter World\
Uninstallation: If you want to revert to the original, simply delete the mod files in NativePC\npc\npc02
Thanks to Vuze for the unpacking tools, daemon1 for the TEX converter, and highsouled for the BC1 Texture Converter.
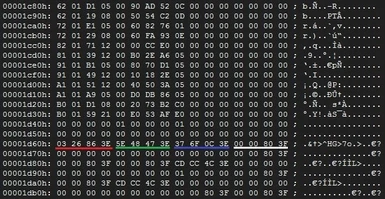
How to edit eye color materials: Refer to my previous tutorials on editing mrl3. You're looking for the texture that refers to the eye bm tex. My understanding was incomplete/incorrect. Idlehands88 has provided me with more accurate information (thanks!). I've uploaded an image to this mod's gallery (corrected by idlehands88). Here's an explanation from their comment:
"
The hex values are in Float for eye color. Float is 4 bytes in length.
RED: 03 26 86 3E = 0.26200876
GREEN: 5E 48 47 3E = 0.194612
BLUE: 37 6F 0C 3E = 0.137143
ALPHA (white underline): 00 00 80 3F
00 00 80 3F = 1.00 OR 100% 00 00 80 BF = -1.00 and can sometimes be used for colors to make something very dark in-game.
The second byte seems to greatly affect the intensity. 3E seems to be the general default. 3F makes the colors much more intense. Higher values (eg. 4F) tend to affect the surrounding colors, ie. eyewhites start changing color as well.
"
How I edited the textures: 1. Unpack the files using this. Look for the TEX files you want to edit. You can use this tool to preview them and see what they might be.
2. Convert TEX to DDS. If it's BC1 (usually BM files), you can usually use this. If it's BC7 (usually GUI files), you can use this. If it's not supported by the above tools, you'll need to experiment with compression type and size using the above preview tool, until it "looks correct". Textures with transparencies tend to currently not convert properly (they come out looking like rainbow trash). Normal maps are usually BC5U (ATI2) and squished vertically. Invert them after you open them. Don't forget to invert back when exporting.
3. Edit the texture in Photoshop. Notice that the textures usually have the right side cut off and appearing on the left. You will need both this misaligned version, and the aligned version. The misaligned version is for the main image, and the aligned version is for the mipmaps. Don't ask me why it has to be that way, because I have no idea. That's just how I got it working properly.
4. When exporting, you will need this. You need to export them in the same DDS format as the original. For BM, compression should be BC1 Linear. For NM (normal maps), choose Normal Map from the Texture Type dropdown menu. I haven't tried other types yet.
5. If you are exporting to a format not supported by the tools above, You will need to export both non-mipmap (misaligned) and mipmap (aligned) versions of the texture. Otherwise you can simply drag drop the edited DDS into the above tools (currently only supporting BC1 or BC7) and it should convert them back to TEX, no problem.
6. If you are converting to another format (ie. BC5U normal maps) you'll need a Hex Editor for this next part. Have the original TEX file handy. Open the TEX file, and both of your exported DDS, side-by-side so you can compare addresses.
7. Copy the original TEX file header (starts at the beginning with "TEX", and usually ends on the last line with 7E 7D, next line starts with 80 7D). You can tell because the header should have lots of 00 byte spaces. When it starts looking like compacted garbled letters, that's when other data starts. You only need the header.
8. Paste the TEX file header over the start of the mis-aligned (no mipmap) DDS file header, also looking for the same place where the header ends (ie. final line with 7E 7D, next line starts with 80 7D).
9. Scroll down to the bottom of the misaligned no mipmap DDS file. Note the address where the file ends (eg. 00080070).
10. Now go to the same address in the original TEX, and in the mipmap DDS. You should see some junk data close to that address. It should look like several lines of "7E 7D 00 00 00 49 92 24 7E 7D 00 00 00 49 92 24". Before these lines is where the main image texture data ends. After these lines is where the mipmap texture data starts.
11. What you need to do is append the misaligned non-mipmap DDS (with the original TEX header overwriting the start) with the bottom aligned mipmap DDS data, and make sure the starting (and ending) addresses match the original TEX addresses. If you do it right, the file size should match the original.
12. Test the texture in-game. If it's rainbow garbled, then you didn't convert to the correct format. If it's completely black or white, then you didn't copy the header properly. If it's misaligned, then you probably mixed up the aligned/misaligned versions.
There's one more way to obtain and edit textures, although I haven't really tried it. Note that it is affected by the texture display bug, meaning whatever you dump will probably be at a lesser mipmap resolution.
2. When in-game, bring up the menu and under Direct 3D 11, click Render Mod Tools. This will open a window where you can refresh to list all current textures loaded. Try using this in as isolated an area as possible (ie. character creation screen, because it has no background).
3. You can then dump the texture (it'll dump to Monster Hunter World/SK_Res/ in the dump folder)
4. You can inject back in by putting the same texture in the inject folder when you're done).