


0 of 0


File information
Created by
manueltransmissionUploaded by
manueltransmissionVirus scan
Safe to use
About this mod
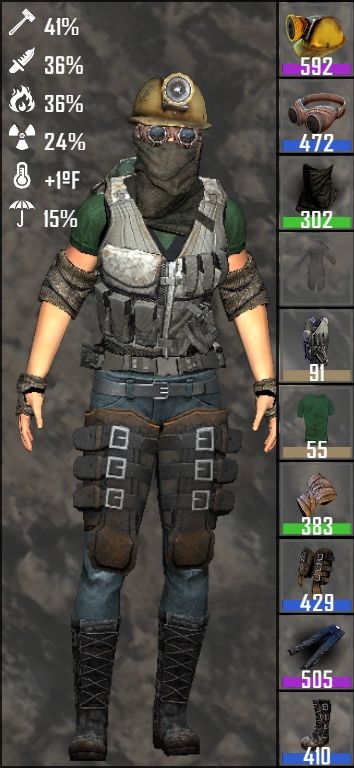
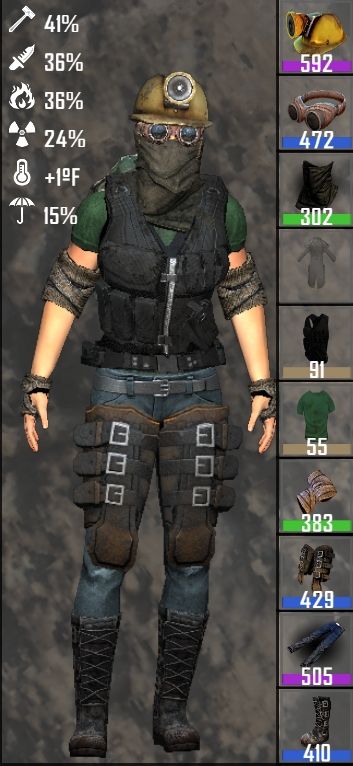
Tested only on Alpha 15 single player. This is a simple XML replacer that changes the color of the Kevlar Vest from its default White/ACU, to a more generic Black/Very Dark Gray. Includes instructions on how to edit the Vest's RGB value via XML.
- Permissions and credits
Tested only on Alpha 15 single player.
I) What This Mod Does
This is an XML replacement of the items.xml file for the PC Steam game 7 Days To Die. Downloading and installing this mod will darken the color of the Kevlar Vest. This was done by adding the following lines to the game's items.xml file under item id="394"
<property name="CustomIconTint" value="33,33,33" />
<property name="Overlay0Tint" value="33,33,33" />
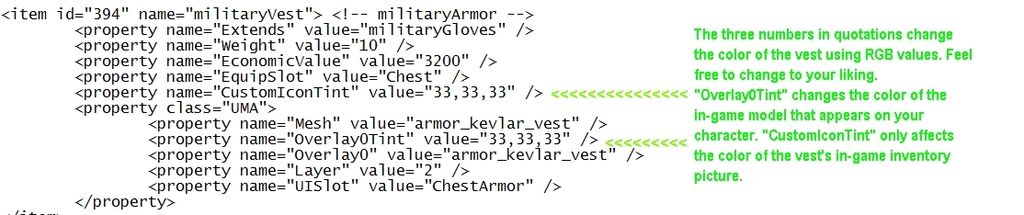
The first affects the color of the Vest's UI icon only. The second affects the color of the Vest's model as it appears on your character. For order of placement, please refer to the below image located under point 5. Downloading and installing the Main File of my mod places these lines for you. Instructions found in point 2 below.
Also, I chose 33,33,33 as the color because 0,0,0 was just ridiculously too dark. It eliminated a fair amount of detail in the model, so I viewed 33,33,33 as an okay compromise. Of course, point 5 below will also explain how to change the color to your liking.
II) Installation
1— Download Main File "A15_MODDED XML for Install - Military Kevlar Vest Black Recolor v1-0"
2— Extract the .rar file using an archiver program such as WinRAR or 7-Zip.
3— Copy extracted items.xml and paste into your Steam game's Config folder where all the XML files are kept. Says "yes" to replace. Don't know where it is? No worries, I got you covered. By default on Windows 7, it is located using the below path.
C:\Program (x86)\Steam\steamapps\common\7 Days To Die\Data\Config
III) Uninstall
For your convenience, I've also included the game's default vanilla items.xml for download in case you make a boo-boo somewhere you can't find, or you just want to go back to default values. The process to Uninstall is virtually identical to installation.
1— Download Optional File "A15_DEFAULT XML for Uninstall - Military Kevlar Vest Black Recolor v1-0"
2— Extract the .rar file using an archiver program such as WinRAR or 7-Zip.
3— Copy extracted items.xml and paste into your Steam game's Config folder where all the XML files are kept. Says "yes" to replace. Follows the same, exact path as above.
C:\Program (x86)\Steam\steamapps\common\7 Days To Die\Data\Config
IV) Compatibility
Generally, anything that changes, edits, replaces, overwrites, or otherwise affects anything in the game's items.xml will conflict with this mod. If you prefer the items.xml of another mod, but still wish to retain the recoloring of the Kevlar Vest, you're in luck! Instructions to individually edit the Vest's colors are included in point 5 below.
V) DIY - How to Customize Vest Colors
To edit any of the game's xmls, you'll need a program that can open it. You'll hear a lot of people recommend downloading the free Notepad++, but I just prefer to use the regular Notepad included with Windows 7. Works all the same.
Firstly, to edit the color of the Kevlar Vest, you'll need to find it in the items XML. Open it up, hold CTRL and press F (or just press F3 only) to bring up the "find text" window, and type "militaryVest" with or without quotes in the window. You'll be taken to where its properties are. Any of them can be edited to your leisure, if you know how, but let's just focus on changing the Vest's colors.
Like mentioned back in point 1, to change the color of the Vest, the two following lines had to be added to the Vest's properties. Please feel free to copy and paste them as you will. If you downloaded and installed this mod's Main File, these lines are already included.
<property name="CustomIconTint" value="XX,XX,XX" />
<property name="Overlay0Tint" value="XX,XX,XX" />
Where those XXs are should be where you put your preferred RGB numbers. RGB are combinations from 1 to 255. For example, the RGB combination for Yellow is 255, 255, 0. Don't forget to make the combinations of both those property names match! Otherwise, the icon color won't match for the in-game model, and vice versa. It's nothing game-breaking, but just something to consider from an aesthetics standpoint.
This bit only applies if you are copy and pasting the two new property names yourself. For the order of where the property names must be added, please see below pic. Remember to properly align the "<property name=" of each new one with the one above it, or it will fail to register in-game.
VI) Closing Words
You might be able to use the CustomIconTint and Overlay0Tint values to change the colors of any other item, but I wouldn't recommend it. If you want to experiment, however, what I would recommend is that you back up all your files by copy and pasting the game's entire Steam folder to another location on your hard drive. Also, keep in mind that this has only been tested on the Alpha 15 (A15) version of 7 Days To Die. This may not work with the next update (whenever the hell it comes out), because XML values and rules can change. Hell, just a few Alphas ago, the game was (apparently) using HEX color codes instead of RGBs, along with a slightly different Overlay Tint command.
Anyways, I hope this guide helped you! Have fun!
I) What This Mod Does
II) Installation
III) Uninstall
IV) Compatibility
V) DIY - How to Customize Vest Colors
VI) Closing Words
II) Installation
III) Uninstall
IV) Compatibility
V) DIY - How to Customize Vest Colors
VI) Closing Words
I) What This Mod Does
This is an XML replacement of the items.xml file for the PC Steam game 7 Days To Die. Downloading and installing this mod will darken the color of the Kevlar Vest. This was done by adding the following lines to the game's items.xml file under item id="394"
<property name="CustomIconTint" value="33,33,33" />
<property name="Overlay0Tint" value="33,33,33" />
The first affects the color of the Vest's UI icon only. The second affects the color of the Vest's model as it appears on your character. For order of placement, please refer to the below image located under point 5. Downloading and installing the Main File of my mod places these lines for you. Instructions found in point 2 below.
Also, I chose 33,33,33 as the color because 0,0,0 was just ridiculously too dark. It eliminated a fair amount of detail in the model, so I viewed 33,33,33 as an okay compromise. Of course, point 5 below will also explain how to change the color to your liking.
II) Installation
1— Download Main File "A15_MODDED XML for Install - Military Kevlar Vest Black Recolor v1-0"
2— Extract the .rar file using an archiver program such as WinRAR or 7-Zip.
3— Copy extracted items.xml and paste into your Steam game's Config folder where all the XML files are kept. Says "yes" to replace. Don't know where it is? No worries, I got you covered. By default on Windows 7, it is located using the below path.
C:\Program (x86)\Steam\steamapps\common\7 Days To Die\Data\Config
III) Uninstall
For your convenience, I've also included the game's default vanilla items.xml for download in case you make a boo-boo somewhere you can't find, or you just want to go back to default values. The process to Uninstall is virtually identical to installation.
1— Download Optional File "A15_DEFAULT XML for Uninstall - Military Kevlar Vest Black Recolor v1-0"
2— Extract the .rar file using an archiver program such as WinRAR or 7-Zip.
3— Copy extracted items.xml and paste into your Steam game's Config folder where all the XML files are kept. Says "yes" to replace. Follows the same, exact path as above.
C:\Program (x86)\Steam\steamapps\common\7 Days To Die\Data\Config
IV) Compatibility
Generally, anything that changes, edits, replaces, overwrites, or otherwise affects anything in the game's items.xml will conflict with this mod. If you prefer the items.xml of another mod, but still wish to retain the recoloring of the Kevlar Vest, you're in luck! Instructions to individually edit the Vest's colors are included in point 5 below.
V) DIY - How to Customize Vest Colors
To edit any of the game's xmls, you'll need a program that can open it. You'll hear a lot of people recommend downloading the free Notepad++, but I just prefer to use the regular Notepad included with Windows 7. Works all the same.
Firstly, to edit the color of the Kevlar Vest, you'll need to find it in the items XML. Open it up, hold CTRL and press F (or just press F3 only) to bring up the "find text" window, and type "militaryVest" with or without quotes in the window. You'll be taken to where its properties are. Any of them can be edited to your leisure, if you know how, but let's just focus on changing the Vest's colors.
Like mentioned back in point 1, to change the color of the Vest, the two following lines had to be added to the Vest's properties. Please feel free to copy and paste them as you will. If you downloaded and installed this mod's Main File, these lines are already included.
<property name="CustomIconTint" value="XX,XX,XX" />
<property name="Overlay0Tint" value="XX,XX,XX" />
Where those XXs are should be where you put your preferred RGB numbers. RGB are combinations from 1 to 255. For example, the RGB combination for Yellow is 255, 255, 0. Don't forget to make the combinations of both those property names match! Otherwise, the icon color won't match for the in-game model, and vice versa. It's nothing game-breaking, but just something to consider from an aesthetics standpoint.
This bit only applies if you are copy and pasting the two new property names yourself. For the order of where the property names must be added, please see below pic. Remember to properly align the "<property name=" of each new one with the one above it, or it will fail to register in-game.
VI) Closing Words
You might be able to use the CustomIconTint and Overlay0Tint values to change the colors of any other item, but I wouldn't recommend it. If you want to experiment, however, what I would recommend is that you back up all your files by copy and pasting the game's entire Steam folder to another location on your hard drive. Also, keep in mind that this has only been tested on the Alpha 15 (A15) version of 7 Days To Die. This may not work with the next update (whenever the hell it comes out), because XML values and rules can change. Hell, just a few Alphas ago, the game was (apparently) using HEX color codes instead of RGBs, along with a slightly different Overlay Tint command.
Anyways, I hope this guide helped you! Have fun!